CAPAct has been designed as a tool to be used side-by-side with LEAP to fulfill requirements related to nonconformities. It is intended to be a simple tool that is intuitive for everyone who uses it.
The purpose of this system is to allow users to identify and investigate quality issues, implement appropriate and effective corrective and/or preventative actions, and prevent recurrence through the collection and analysis of information. With the ability to communicate within the app and set separate deadlines for each stage of the nonconformity investigation process, users can remain vigilant of the issues that occur within the lab and how each is being dealt with.
Customizable features and search/filter functions will allow the lab to easily analyze all of the data gathered and make informed decisions on improvements required as a whole. In addition, log features throughout the app ensure traceability and accountability for every action taken. Drive timely, transparent, and appropriate continuous improvement activities within the laboratory through implementation of CAPAct!
(All Users)
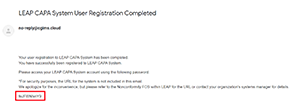
- When you are registered as a user on CAPAct, an automatic email will be sent with a temporary password. (See screen below)
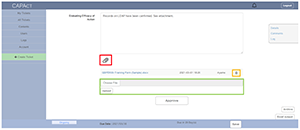
- Read through the End-User License Agreement (EULA) and click “Agree”.
-
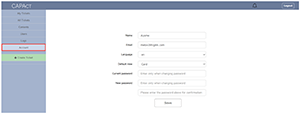
Now that you are logged in, click on “Account” in the left menu. General details will be displayed on this screen. Insert your temporary password into “Current password” and enter in your “New password” and click “Save”. Once your password is successfully changed, a message in green stating “Changes have been successfully reflected” will show up on the top of the screen. Note that you can also change other settings including preferred languages (English or Japanese) and default ticket view (Card or List) on this screen.
(Master Users Only)
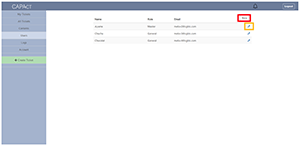
- To add other users to the organization, click on “User” in the left menu.
-
Click on “New” on the right corner of the screen (as indicated in red in image below)
-
A pop-up screen (pictured below) will show up. Enter in all relevant fields including the name of the user and their respective email. Click “Save”. Note that organization users can only add general users. Master users can only be added to an organization by CGI.

- An email will automatically be sent to the registered user’s email address with a temporary password.
-
To disable users, click on the Tool icon next to the user you wish to disable (as indicated in orange below).
-
A pop-up screen (pictured below) will show up. Click on the “Disable” checkbox at the very bottom and click “Save”.
(Master Users Only)
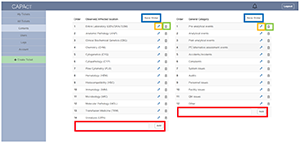
- To change the content of the predefined pull-down menu, click on “Contents” in the left menu.
- To add a new content, simply type in your new content in the text box provided at the bottom of the screen (indicated in red) and click “Add”.
- To edit an existing content, click on the tool button next to the relevant content (indicated in orange) and make changes in the pop-up screen and click “Save”. Note that editing an existing content for which tickets are already assigned will lead to the edits being reflected in all tickets (including the ones that have been completed).
- To delete an existing content, simply click on the trash box next to the relevant content (indicated in green) and click “Delete”. Note that deleting content cannot be undone. Also, if the content is already assigned to a ticket, it cannot be deleted.
- To change the order of how the content displays in the pull-down menu, drag and drop the content as needed to display the correct order and click “Save Order” (indicated in blue).
- All changes to the content can be viewed in the log at the bottom of the screen.
(All Users)
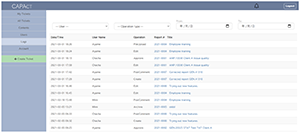
- There are two dashboards for viewing tickets. The “My Tickets” dashboard is a dashboard summarizing tickets you have created. The “All Tickets” dashboard is a dashboard summarizing all tickets created within your organization.
-
Both dashboards display a pie chart on the top categorizing tickets into Ongoing (i.e., tickets that have not been completed and are still within the final due date for Evaluation of Efficacy; indicated in blue), Late (i.e., tickets that have not been completed and are past the defined due date; indicated in pink), Completed Late (i.e., tickets that were completed but were completed past the defined due date; indicated in yellow), and Completed (i.e., tickets that were completed on time; indicated in green). Note that this pie chart changes as you filter or search for specific tickets. For example, if you filter location and select “Entire laboratory”, only tickets with this content selected for Observed/affected location will display both in the ticket list and in the pie chart.
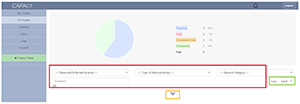
- Below the pie chart (identified in red in image above) is where you can filter and search for specific tickets. For keyword searches, commas must be entered between two words if you would like to search for tickets including words A and/or B (e.g., Unacceptable, PT). If you do not type in a comma, the search will consider it one word and will search for tickets that include the word AB (e.g., Unacceptable PT). Note that the general keyword search does a search in all text fields (i.e., title, identify the problem, investigation detail (RCA), corrective and/or preventative action, and evaluating efficacy of action).
- Advanced searches can be performed by clicking on the accordion symbol (indicated in orange in image above). Here, you can search for tickets that are assigned urgent status or that have been archived; search for tickets that were created within a certain timeframe; or do a narrowed keyword search so the system only searches for the keyword in your indicated text field.
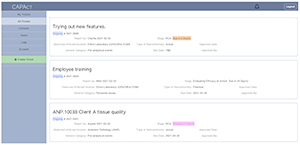
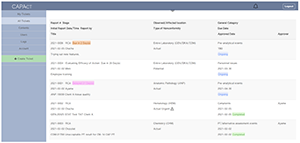
- While all tickets are displayed based on your default ticket view, you can change this view by selecting the preferred view in the View section (indicated in green image above). While both views will contain the same information, a card view is preferable if you want to see tickets in a more isolated view; a list view is preferable if you want to glance at multiple tickets at once. (See images below)
- Status of the ticket is determined by the final due date (i.e., the due date you set for the last step: Evaluating Efficacy of Action). However, you can see the stage of the card and the status of the stage in the ticket view. Note that when a stage is due in 7 days, the due date indicated next to the stage changes to an orange color. If the stage is past its due date, the number of days late is indicated in pink.
- To view details of a ticket, simply click on the relevant ticket in the list or card view.
(All Users)
- Tickets can be created by anyone who is a registered user in the organization by simply clicking on Create Ticket in the left menu.
-
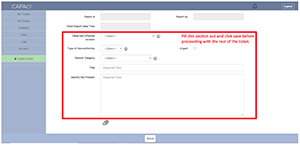
In order to register a ticket, you must fill out the following and then save:
- Observed/affected location
- Type of nonconformity
- General category
- Title
- Idendify the problem
NOTE: You can select "Urgent" and due dates for all stages at this point, but these are not mandatory fields. - Once you click "Save", the other parts of the ticket will be made available for use.
(All Users)
- Each stage has an attachment function, and relevant evidence should be uploaded as necessary. To see what files are already attached or to attach a new document, simply click on the paperclip mark underneath the relevant stage (indicated in red).
- Any files that have already been uploaded will be displayed as a list form with the upload date and person indicated. Files that have been uploaded can be deleted by clicking on the trash icon (indicated in orange).
- To select a new document to upload, click on Choose File, select the relevant document and click upload (indicated in green).
(All Users)
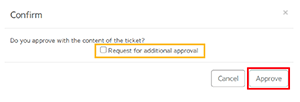
- Once details of a ticket have been completed (all details up until Evaluating Efficacy of Action), the ticket is ready for approval. In order to approve a ticket (can approve any ticket if you are a Master User; can approve any ticket you did not create if you are a General User), click on the Approve button at the bottom of the Ticket Detail screen.
- A pop-up screen shows up for approval. If only a single approver is necessary, the approver shall just click “Approve” (indicated in red). If multiple approvals are necessary, the approver shall click on the “Request for additional approval” (indicated in orange) before clicking “Approve”. This process can be done as many times as needed.
(All Users)
- Details of the ticket can be exported to an Excel format if necessary. Simply click on the “Excel output” button on the right side at the bottom of the ticket detail (indicated in red). Note that attached files will not be downloaded or reflected in the document, but the number of attachments in each stage are noted in the exported Excel report.
(All Users)
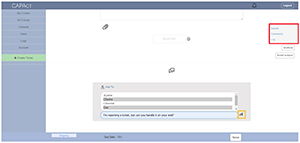
- Once the ticket has been created (see above), the Comments and Log section become available. Clicking on Comments on the right side of the screen takes you directly to the Comments section for this ticket (indicated in red on Figure A).
- To direct a message to a different user in the organization, click the “Add To” button, and a list of all users within the organization will show up. Select the users you want to message. You can select multiple users by holding down the Ctrl button and selecting the relevant users. Write a message in the text field below the user selection, and then click the “Send” icon (indicated in orange on Figure A).
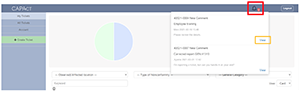
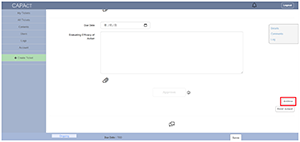
- Users selected will receive notification that a message has been sent to them when they login to CAPAct as the bell sign on the right corner will be marked with the number of unread messages (indicated in red on Figure B). Clicking on the number will show a list of messages. To view the relevant card, simply click on View (indicated in orange on Figure B), which will take you to the comment section of the relevant ticket. Once you have read the message, the message will be marked with a check mark to indicate the message has been read (Figure C).

(All Users)
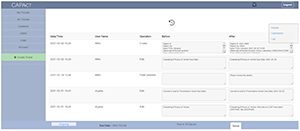
- All changes to a ticket are recorded in the log. Simply click on “Log” in the right menu that shows up when you open a ticket. The log will indicate when changes are made as well as who made them and the details of what was updated/changed.
(Master Users Only)
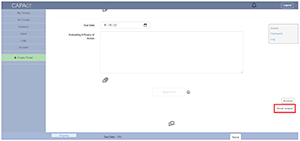
- Master users have the ability to archive tickets whenever needed. Simply click on the “Archive” button on the right side at the bottom of the ticket detail (indicated in red). A warning sign will appear as archiving a ticket cannot be undone. Archiving a ticket will remove the ticket from the main dashboard unless otherwise indicated in the advanced search section.
(Master Users Only)
- A summary of all changes made to tickets created within the organization is proved on the Logs dashboard. Simply click on “Logs” in the left menu. The log will indicate when changes are made as well as who made them as well as the general change made and to what ticket these changes were made.