The decision to effectively implement Quality Management Systems (QMS) into your laboratory will have a profound and positive impact on your entire operation. The objectives of QMS are to enhance and increase:
- Economic Efficiencies
- Productivity
- Patient and Employee Safety, and most importantly;
- Quality Patient Outcomes
QMS can appear to be overwhelming. Notwithstanding, when you break QMS down into its base components, you will find that each of these components is mostly just common sense. The challenge in implementing QMS is in managing these hundreds, or even thousands of components in an organized and efficient manner. LEAP has been designed to manage all these components transparently and with organizational and individual accountability.
Another key element of effectively implementing QMS is the ongoing involvement of laboratory stakeholders (yes, this includes you!) Implementing and maintaining QMS only with a few people will lead to a “paper tiger” and will not be effective in accomplishing the stated objectives. LEAP allows your entire staff to be involved in building and maintaining your QMS to maximize the value of your efforts and extract the intrinsic value from QMS.
Any effective QMS is predicated on accountability and transparency. LEAP has a proprietary system of checks and balances combined with user-specific pages, detailing and organizing all users QMS tasks. There is also a QMS Dashboard for the entire laboratory and a Department Dashboard for each individual department, providing 24/7 transparency throughout your organization.
LEAP also provides all the resources your staff will require to build and maintain QMS. With a single click, you will have a detailed yet simple explanation about the intent of each QMS component and how to implement it into your QMS. You will also have built-in education programs, samples and templates and other useful links.
As a result of using LEAP, your laboratory will not only have all the evidence of QMS compliance ready for inspection and in one place, you will also have implemented it in a way that provides enduring value.
QMS is not a destination, rather it is the ongoing journey. LEAP will help you on your QMS voyage with new standards being added on an ongoing basis.
As a LEAP user you will have access to: a) LEAP’s video tutorial library, b) LEAP dictionary, c) Release Notes d) the ZenDesk help center/FAQ page, and a e) QMS consultant. Each of these tools are described below:
-
LEAP Video Tutorial Library contains detailed explanations on all aspects of LEAP and how it will help you gain and maintain Total Quality Management (TQI). From the login page of leap, simply click on the “Tutorial” link. This video library can be viewed in sequence or used as a quick reference, using the search function, when you have questions about LEAP.
This page also includes the LEAP dictionary, downloads to manuals, specifications, PDF versions of the tutorial videos and more are all located on the LEAP Tutorial page. - LEAP Release Notes are also found at the bottom of any LEAP page. Click the “Release Notes” link to view recent updates to LEAP and view what has been changed or added to LEAP.
- The ZenDesk Help Center is built right into LEAP. Just look to the bottom left of any screen after logging in. You must login to access the Help Center. Click on the support button for a quick search box where you can enter in terms, questions, or key words for reference. In the event the help center is unable to answer your question, further assistance is available through Question submission page located inside the help center.
- Your LEAP Consultant’s Job is to help you with technical questions. It is not the LEAP consultant’s job to do your work for you. Doing so will only ensure a poor understanding of QMS processes and a poorly executed QMS. Furthermore, having someone else do the work for your lab runs contrary to the spirit and letter of effective QMS. LEAP consultants will be available for document review, but your staff will be required to make all the actual changes in the documents.
We understand that QMS may be a new field for you and your staff. We also understand that you are busy meeting the needs of all your clients. Moreover, the fact remains that if you don’t build your QMS processes using your own hands and minds, and considering the unique needs of your laboratory, you will not receive the value your laboratory deserves from your QMS investment.
The act of true learning is by definition the act of working through the process of understanding the nature of problems and then solving these problems. Sometimes the most effective learning, in fact, comes from making mistakes and failing. LEAP provides all the resources and tools you will need to ultimately succeed in building your QMS, but this will require going through the process, step by step. In time, you, and your staff will build a sturdy QMS house that will better serve the needs of your patients and the healthcare system in unimaginable ways.
QMS is truly a journey. If you choose to be inspected and certificated, this certification is just the first step along this journey. True implementation of QMS will only come after years of hard work, and only when it becomes nearly invisible, becoming a natural way of operations and is a shared habit.
LEAP is your ship and your laboratory is both the Captain and the Crew. Bon Voyage!
As mentioned earlier, the individual components of QMS are mostly common sense. Let the following act as an example for one basic QMS component. This is for you to understand the concept and may differ in LEAP samples and templates. Let’s look at one component together: Quality Indicators (ISO Standard 4.14.7).
Gap Analysis Questions - Derived from Established StandardsBased on the actual ISO standard, CGI has established what documents are absolutely necessary and created LEAP standards based on this knowledge. The following are the standards for Quality Indicators.
- Does the laboratory have a "Quality Indicators Policies and Procedures" and are these regularly reviewed?
- Does the laboratory document its quality indicators and regularly review performance on these indicators?
Policy Developed in Response to the Actual ISO Standards
If you look at the Policies and Procedures, both template and samples, you will notice thatthe policies have already been filled out. The policies within LEAP are based on the actual ISO standards and have been reworded so that the standard becomes a policy. The following is the policies that can be found for Quality Indicators.
- The laboratory must establish quality indicators to monitor and evaluate performance throughout critical aspects of pre-examination, examination and post-examination processes.
- The laboratory must plan the process of monitoring quality indicators, which includes establishing objectives, methodology, interpretation, limits, action plan, and duration of measurement.
- The laboratory must periodically review the indicators to ensure their continued appropriateness.
- The laboratory, in consultation with the users, must establish turnaround times for each of its examinations that reflect clinical needs.
- The laboratory must periodically evaluate whether or not it is meeting the established turnaround times.
Procedure(s) Developed to Implement Your Policy
In the sample Policies and Procedures, a sample procedure to implement the policy abovehas been provided. Note that procedures in LEAP have been designed to provide you withan idea of how the necessary documents within LEAP should be established and maintained using various LEAP features. Theoretically, the following should be sufficient to comply with this particular standard.
- The sample Quality Indicator Policies and Procedures found in LEAP should be reviewed, modified, approved, and implemented in accordance with your own laboratory’s operation.
- The template Quality Indicator Worksheet and template List of Quality Indicators (for the Laboratory Director Department) will be reviewed, modified, approved, and implemented.
- This customized Quality Indicator Worksheet and List of Quality Indicators will then be used to document the progress of each quality indicator established by the laboratory and uploaded into the appropriate LEAP maintenance folder at designated intervals.
Materials to be Loaded into the Master Evidence Folder
Once you go through all the various tasks associated with a LEAP project, you will have toplace your evidence of compliance into the Master Evidence Folder (MEF). In this example, you would need to place the following into the MEF.
- Customized and Approved Quality Indicator Policies and Procedures
- Customized and Approved Quality Indicators Worksheet (Blank template)
- Initial completed Quality Indicators Worksheet, if any
- Customized and Approved List of Quality Indicators (only for Laboratory Director Department; Blank template)
- Initial completed List of Quality Indicators, if any
Materials to be included in Maintenance Folders
- Quality Indicator Policies and Procedures for [Annual] review.
- Completed Quality Indicators Worksheet for [Quarterly] review.
- Completed List of Quality Indicators for [Quarterly] review.
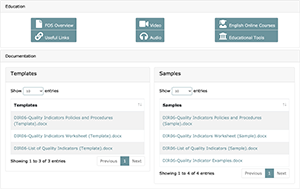
With LEAP’s extensive support system, everything you need to gain and maintain QMS compliance can be found within LEAP. Another key element in LEAP’s support system is the content library associated with each Family Of Standards (FOS). These include materials that have been prepared for each QMS component in LEAP. FOS’s will be discussed, in detail, later in this document. In each of these content libraries you will find:
- FOS Overviews that includes the actual text from the accreditation bodies such as the CAP, ISO or more generally be a part of basic QMS best practices. Each Overview includes a common-sense explanation of the rules each FOS addresses, advice about how to implement it and why it is important to you and your lab.
- Online Courses that link to optional external LIS systems.
- Educational Tools have been developed for each FOS and are ready for use in educating your staff members on how and why the FOS should be implemented.
- Templates have been prepared for you to help expedite the document creation process and better understand the end result of what QMS documentation should look like.
- Samples are available for each template to give you an idea of how you should be creating/filling out your documents. These can be used when crafting your customized documents. There may be an extra sample document in LEAP that is not associated with a corresponding template; these samples contain information relevant to the FOS (e.g., examples of quality indicators you can consider implementing in your lab) but is not a required document to maintain compliance to standards.
- Useful Links An optional link to resources located outside of the LEAP platform.
- FOS Audio for users to listen to FOS Overview content on the go.
- FOS Video may include optional instructional videos when available.
The following is an example of an FOS Content Library:
LEAP will be customized specifically to your laboratory. To start this customization process, you will be provided a survey sheet in the form of an Excel file. Within this file you will insert the following information:
- Name and email address of the Organization Manager.
- A list of all technical departments that are applicable to your laboratory.
- Name and email addresses of one or more Department Managers in each Department; if there is more than one Department Manager, identify which person will be the Primary Department Manager.
- Names and email addresses of all members to be included in each department.
Remember, with LEAP, you can involve your entire laboratory, and you are encouraged togive everyone a role in LEAP even if you do not envision giving them specific tasks related to creating and maintaining QMS.
After providing this information to your LEAP Coach, your LEAP laboratory will be created for your exclusive use. Typically, this process takes about a week.
When your laboratory’s version of LEAP is complete, each user will receive an email with a temporary password. Users will be asked to login using this temporary password to become official LEAP users. All users should change the temporary password before getting ready to start working towards developing and maintaining effective QMS!
With your permission, others may be given permission to access your LEAP laboratory. This can include consultants and inspectors. LEAP Administrators will also have permission to enter your LEAP account but will be unable to make any changes to your data.
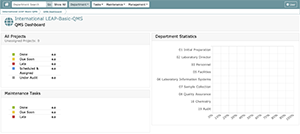
After your LEAP Laboratory is customized and you login, your main QMS Dashboard will look like this:
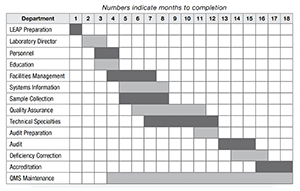
The following is a conceptual depiction of how you might consider scheduling and assigning your department FOSs. Know that this is highly variable and depends not only on the number of staff available, but also how motivated staff are, as well as the quality and dedication of the leadership.
Auto-scheduling Function: You may choose to use the auto-scheduling function. This isprogrammed right now based on the assumption that a single document will require 16 hours per task to complete. The auto-scheduling function should only be used if you believe all aspects of the project including set-up to approval can be completed in a shorttime span. Using the auto-scheduling function without proper consideration can lead to hard to meet scheduling dates.
Changing Schedules: LEAP allows users to change project schedules at any time until aproject task becomes LATE. After a project task becomes LATE, only a Project Manager, Department Manager, or Organization Manager can change task due dates. The take home message: either get your tasks done on time or seek approval from your superior regarding changing the due date of a task/project. Remember, a delay in a task could lead to a delay in subsequent tasks and completion of the project overall. Therefore, pushing back dates may impact the progress of the completion of your initial QMS scheduling objectives.
QMS can appear overwhelming. However, when you break QMS down into its base components, you will find that each of these components is mostly just common sense. The challenge in implementing QMS is in managing these hundreds, or even thousands ofcomponents in an organized and efficient manner. In time, the inter-linkages will become intuitive and obvious. LEAP has been designed to manage all these components transparently and with accountability.
Of course, it is possible to address each of these components (standards) separately. LEAP, however, groups these components into what we call a Family of Standards (FOS).
FOSs have been created using the following guiding principles:
- Manageable volume of work for a single team
- Shared knowledge base
- Logical association
- Department-specific applicability
LEAP is equipped to support CAP and ISO 15189 accreditation as well as implementation of Basic QMS Standards.
For ISO 15189, you will find a total of 47 FOSs in seven general ISO departments included in LEAP. 3 FOSs are included in each of the technical departments, but 2 of these FOSs can also be found in the Quality Assurance Department (one of the general ISO departments). These 3 FOSs associated to the technical department are repeated in eachdepartment so that departments can manage their department-specific documentation and data.
Each FOS for ISO 15189 consists of from one to about ten standards, usually each linked to a single document available in LEAP and required to fulfill that standard. In all cases these standards are posed as questions and are listed within the Gap Analysis by clicking on the plus sign to the left of the FOS title.
FOSs for CAP standards have been incorporated using the same underlying logic, but the standards displayed in LEAP are not created by CGI and rather are directly taken from theofficial CAP checklist. Note that the CAP checklist and related FOSs consist of copyrighted materials and are only available to laboratories actively seeking CAP Accreditation and have paid all required fees to CAP.
Laboratories seeking a Basic QMS implementation should notify CGI of this request. CGI will then prepare a customized version of the ISO content which will include exclusion of certain departments and FOSs. This may be a great first step toward gaining QMS in your laboratory. It is possible to activate these excluded departments and FOSs at any time; however, fees may apply.
In order to simplify and organize your QMS implementation and maintenance, LEAP is divided into the departments containing a particular set of FOSs that are inter-related to each other. Each of these departments must be assigned a Department Manager during the customization process or added as a new user by the Organization Manager. You may choose to have more than one Department Manager, but a single manager must be designated as the Primary Department Manager. All departments will have members and a default “month to begin maintenance”. Both department members, their user level in the department, as well as the maintenance start month can be modified in the maintenance management screen within LEAP by Organization Managers or managers of the that department.
The following is the list of the departments with an overview of the department basic responsibilities.
Common Departments
Initial Preparation Department: This department is designed to prepare your laboratory to efficiently use LEAP. This should be the first department scheduled for completion. Note that this department is not a requirement for ISO or CAP but will be activated in LEAP for the purpose of educating users about LEAP before beginning the actual QMS process
Audit Department: The audit department has been created to help your laboratory through the process of preparing for an external audit. This should be one of the last departments completed. Note that, similar to the Initial Preparation Department, this department is not a requirement for ISO or CAP but will be activated in LEAP to help laboratories prepare external audit applications.
Laboratory Director Department: This department covers overall responsibility for the laboratory’s safety, quality, and services. (6 FOSs/4 FOSs included in Basic QMS)
Personnel Department: This department is designed to help you prepare and maintain QMS required personnel compliance and documentation. (5 FOSs/2 FOSs included in Basic QMS)
Education Department: This department ensures that all staff are properly educated and this education is documented. Note that if you decide to delegate all LEAP education modules to the Education Department, this working group will be responsible for ensuring that all laboratory users read through and understand materials in the Content Library. (2 FOSs/Not included in Basic QMS)
Facilities Department: This department defines and ensures maintenance of QMS compliant facilities. (4 FOSs/2 FOSs included in Basic QMS)
Information Systems Department: This department covers LIS and IT related system compliance. (3 FOSs/1 FOS included in Basic QMS)
Sample Collection Department: This department covers unique needs of sample collection as the primary interface with patients. Note that, even if your laboratory does not have a sample collection facility, this department is required in terms of defining sample collection requirements and transport, reception, and handling. (5 FOSs/All FOSs included in Basic QMS)
Quality Assurance Department: This department covers all other standards related to overall QMS implementation and maintenance. (22 FOSs/3 FOSs included in Basic QMS)
Technical Departments
For ISO, there are currently 10 technical departments available: Anatomic Pathology, Chemistry, Cytopathology, Flow Cytometry, Hematology, Immunology, Microbiology, Molecular Pathology, Transfusion Medicine, and Urinalysis. Each technical department currently has 3 FOSs available (all of which are included in Basic QMS). 2 of these FOSs are also available in the Quality Assurance Department, and it will be up to the laboratory to decide whether to use the duplicate FOSs (i.e., manage general policies and procedures/rules in the QA department and the detailed documentation, data, records, etc., in the technical department) or to N/A one of the FOSs so that only one department will be responsible for implementing and maintaining QMS for that particular FOS.
Note that smaller laboratories may choose to manage most technical department FOS’s within the Quality Assurance Department. On the other hand, larger laboratories, which tend to have more decentralized management may choose to manage most or all technical department FOSs within each technical department. Of course, it is also possible to manage different departments in different ways, many times depending on personnel strengths and weaknesses. Each lab is different, and you should think long and hard about your unique needs and objectives.
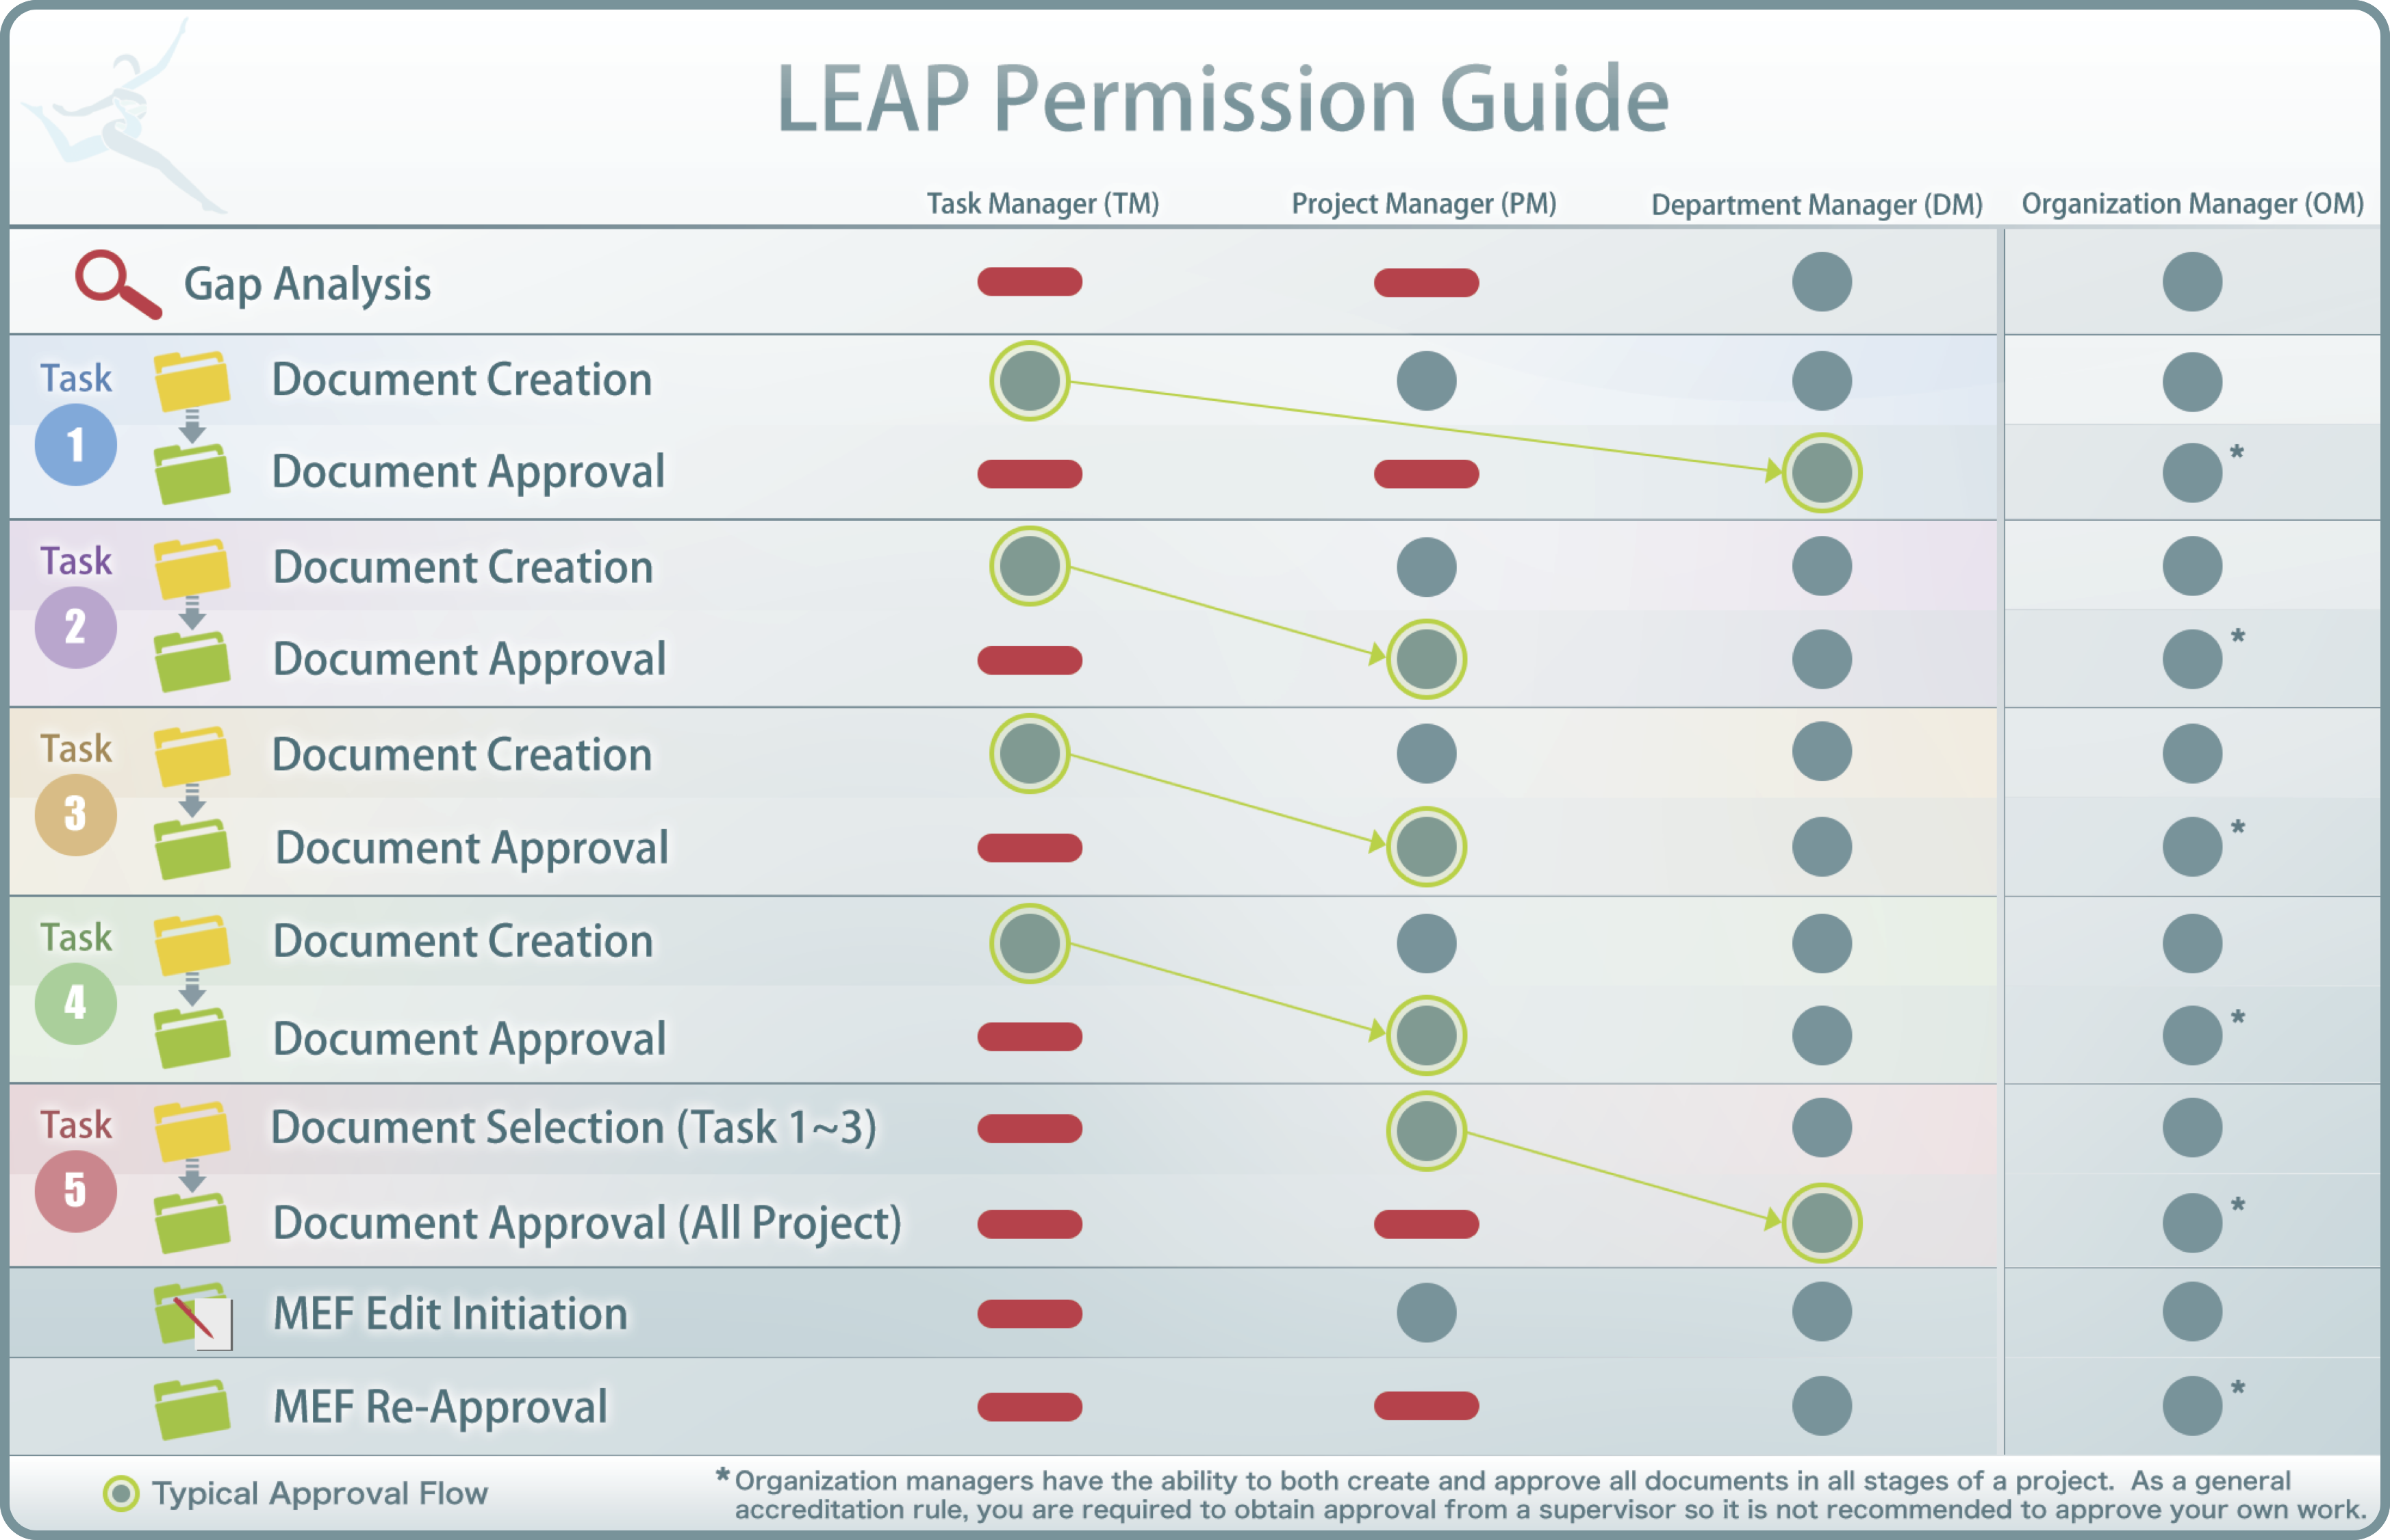
The following describes the LEAP user hierarchy. Different permissions are provided depending upon the needs of that person.
Permissions
System Administrator: Create Organizations / Create Organization Manager Accounts / Create User Accounts / Customize Leap Content
Consultant: Organization Review / Support / Project Approvals / Maintenance Approvals / View Evidence Folders / Initiate Organization / Department Self-Audits
Inspector: The laboratory can give permission to third party inspectors which will allow them the ability to search and view all documents saved in LEAP prior to and/or during an inspection. Inspectors will have read-only permission but will be able to leave comments
Organization Manager (OM): Add Users / Assign Department, Project, and Task Managers / Perform Gap Analysis / Populate, View and Approve all Evidence Folders (MEF [Master Evidence Folder], WEF [Working Evidence Folder], MF [Maintenance Folder]) / Initiate all Self-Audits (i.e., Organization, Department, Project)
Department Managers (DM): Perform Gap Analysis / Assign Project and Task Managers / Populate, View and Approve all Evidence Folders (MEF, WEF, MF)
Project Managers: Assign Task Managers / Populate, View and Approve WEFand MF / Populate MEF
Task Managers: Populate and Request Approval for WEF
Refer to the following Permission Guide for specific permissions given to each user type based on Task. Keep in mind that effective QMS is based on the assumption that a supervisor will perform the review and approval of all documentation. Therefore, while OMs and DMs are able to populate evidence, this should be avoided as much as possible unless the DM populates the folder and the OM is going to approve the final documentation.
LEAP has various dashboards; the following lists and explains the function of each main dashboard every user has access to.
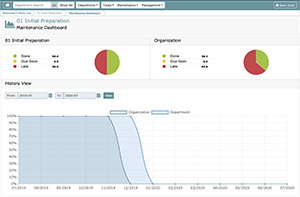
QMS Dashboard: View QMS Project and QMS Maintenance status for the entire laboratory and all departments in a single place. New standards, late projects, and late maintenance are also prominently displayed.Department/Assay Dashboard(s): Each department and each assay activated in the department has its independent dashboard. Note that the assay feature is currently not available in English LEAP. View QMS Project and QMS Maintenance status for individual departments/assays. The status of each department member is also displayed.
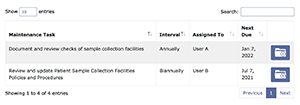
Department → Maintenance Dashboard: Each department has its independent maintenance dashboard to track QMS maintenance due soon (30 days or less) and recordcomplete and late maintenance tasks. Your past and present maintenance tasks will be recorded and displayed in the dashboard. (This, of course is the ultimate Quality Indicator!)
Universal Maintenance Calendar: There is a universal maintenance calendar for tracking and organizing all QMS maintenance Tasks. On this page, due dates and all maintenance settings can be modified for applicable maintenance tasks.
All Tasks: This page shows all tasks in your organization. With each Task, you can view the steps required to complete the task, the task's project name, who the task was assigned to, the status of the task, it's due date, and its associated evidence folder.
My Tasks: Every user in your LEAP laboratory has their own task page. This lists all project tasks and due dates that have been assigned to them, viewable with single click access to any support information they need to complete tasks.
All Maintenance Tasks: This page shows all of the maintenance tasks across the entire laboratory categorized by department. Note that only active instances of current maintenance tasks will be shown here.
My Maintenance Tasks: Every LEAP user in your laboratory has their own maintenance task page. This lists all maintenance tasks and due dates that have been assigned to them, viewable with single click access to any support information they need to completetasks.
My Document Reviews: Every LEAP user in your laboratory has their own document review page. This lists all documents for review that have been assigned to them, viewable with single click access to any support information they need to complete tasks.
Below is an example of the primary QMS dashboard.
To the left of the screen:
- Overall QMS Project Status
- Overall Maintenance QMS Status
- View New/Revised FOSs with new or revised standards to be considered for implementation
- View Late Projects
- View Late Maintenance
To the right:
- Department Statistics: QMS Status of all laboratory departments
Navigate to:
- Departments you have permissions to attend using either the Department Search or Show All button.
- Task-related pages (i.e., My Document Reviews, My Tasks, All Task Manager)
- Maintenance-related pages (i.e., My Maintenance Tasks, All Maintenance Tasks, and Universal Maintenance Calendar)
- Management related pages (Organization Management (if you are an OM), Department Management (if you are an OM), User Management (if you are an OM), Audit Log, Document Management, and Retired Documents)
- User Settings and Logout
Below is an example of The QMS Dashboard
To the left of the screen:
- Department Project Status
- Maintenance Status
- Organization Project Status
- New / Revised FOS
- Late Projects
- Late Maintenance
To the Right:
- Department Statistics (i.e., Project status for each user in the department)
Only Accessible from a Department Dashboard is the Department Menu. This menu allows access to the following screens. Note that navigation to other dashboards which can be accessed from the QMS dashboard (e.g., My Tasks, My Document Reviews, etc.) remains possible even after you access the Department Dashboard. The only new aspect of the navigation is the Department Menu.
- Maintenance Dashboard
- Project List
- Gap Analysis (only appears if you are a DM or OM)

When you first log into LEAP you’ll notice a message board at the top of your QMS Dashboard. This is a personalized message board and it will contain all LEAP automated messages directed to you. As projects are created, you will see messages here pertaining to task assignments, document reviews, and approval requests depending on your role within your laboratory. Additionally, system wide messages will appear here as well.
When new messages arrive, you will see an unread counter both at the top of any LEAP screen as well as on the QMS dashboard itself. To clear a message that you have viewed, simply click on the red or clear all messages with the “Clear All” button at the top of the message box.
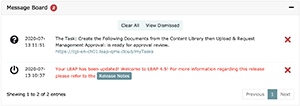
All messages will be denoted with a symbol that gives you quick feedback on the nature of the message. Those icons are as follows:

This icon will be displayed anytime a system-wide message is sent by the administrator. Messages of this type would include system maintenance announcements, significant software changes and updates, or important updates pertaining to LEAP content.

This icon will be displayed anytime an organization-wide message is sent by the organization manager. Messages of this type would include information pertinent to the entire laboratory.

This icon will be displayed anytime a department manager sends a message to his/her department. These messages will normally contain information or notices that pertain to the department from which they are sent.

Project messages pertain to any stage of a project and its settings. Examples of project type messages would be project manager assignments, new or modified standards that apply to a project, project self-audits, etc.

Task messages relate to project tasks. When you see this icon, the message will pertain to task assignments, task status changes, task reassignments, task due dates, etc.

Maintenances task messages, as the name would indicate, are related to maintenance tasks. Here again, messages will pertain to maintenance task assignments, maintenance task reassignments, maintenance task status changes, etc.

Document reviews are often requested by project managers. When you are requested to review a document, a message will appear accompanied by this icon in your message board.

When tasks are completed, approval requests are made to both project managers and department managers. Those approval requests will be sent in the form of an email and also appear in their message boards with the above indicator icon.

When approval requests are denied, the approval rejection icon will be displayed along with a message indicating which task has been rejected along with a link so you can quickly review your materials and remedy any problems found during the approval request process.
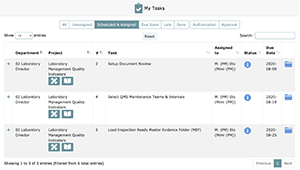
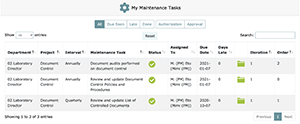
There are three pages within LEAP that are personalized for every LEAP user: My Tasks, My Maintenance Tasks, and My Document Reviews.
The My Tasks page displays project tasks assigned to you that you must complete in order to implement your organization’s QMS.
The My Maintenance Tasks page displays maintenance tasks assigned to you that you must complete in order to maintain your organization’s QMS.
The My Document Reviews page displays documents that have been approved in Task 1 which you need to review and confirm that you understood the content. Delays in Document Review means you have not complied with the educational requirement set forth by ISO and CAP (i.e., that all relevant personnel must be educated on approved documents prior to it being placed into effect).

Note that all three of these pages should be regularly checked by all users to ensure that there are no delays in implementation and maintenance of QMS.
In the case of My Tasks and My Maintenance Tasks, the materials can be sorted by:
- All Tasks assigned to you (i.e., All)
- All Tasks assigned to you that will be due soon (i.e., Due Soon)
- Late Tasks assigned to you (i.e., Late)
- All Tasks assigned to you that have been completed (i.e., Done)
- Tasks you have requested others to approve (i.e., Authorization)
- Tasks others have asked you to approve (i.e., Approval)
Note that the My Tasks page also allows you to sort by:
- All Tasks that have no due date assigned (i.e., Unassigned)
- All Tasks that are assigned and scheduled but are not within the due soon window (i.e., Scheduled & Assigned)
The Default setting for the My Tasks page is set at “Due Soon” whereas the My Maintenance Tasks is set at “All”.
From the My Tasks page, you can also navigate to:
- Task Manager: View your tasks in relation to others tasks including who is assigned to other tasks in the same project and their respective due dates; if you are a PM/DM/OM, you can use this screen to change these details
- Content Library: Provides you access to Overviews, Education Modules, Samples and Templates
- Evidence Folders: Deposit evidence and request approval
- Task List: Displayed upon clicking the “+” link, lists all documents or task details that you need to complete in association with the task
The My Document Reviews displays a list of FOSs that contain documents assigned to the user for review, and allows users to confirm they have finished review of each document. This can basically act as your educational record of each individual SOP, for example. While it is possible to approve an MEF without completing all document review, CGI highly recommends that the document review be completed prior to final approval of the MEF to ensure that the documents implemented have been reviewed and understood by all relevant parties.
Document reviews are listed by their parent projects scheduled due dates. This gives you an idea of how much time you have to complete each review.
The My Document Reviews page’s, “To Review” tab displays documents that have been approved in Task 1 which you need to review and confirm that you understood the content. Delays in Document Review means you have not complied with the educational requirement set forth by ISO and CAP (i.e., that all relevant personnel must be educated on approved documents prior to it being placed into effect). The “Reviewed” tab shows all documents that the currently logged in user has marked as reviewed. Reviewed files are grouped by project, and project completion dates.
Note that all three of these pages should be regularly checked by all users to ensure that there are no delays in implementation and maintenance of QMS.
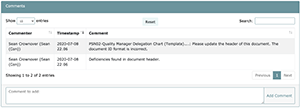
For every Task there is an associated evidence folder. This evidence folder serves several functions. These functions include:
- Deposit Evidence that demonstrates the completion of tasks
- Acceptance or rejection of evidence associated to the task by a superior
- Communication/Comments log
- Storage of document review and maintenance settings
Working Evidence Folder (WEF), Master Evidence Folders (MEF), and Maintenance Folders (MF)
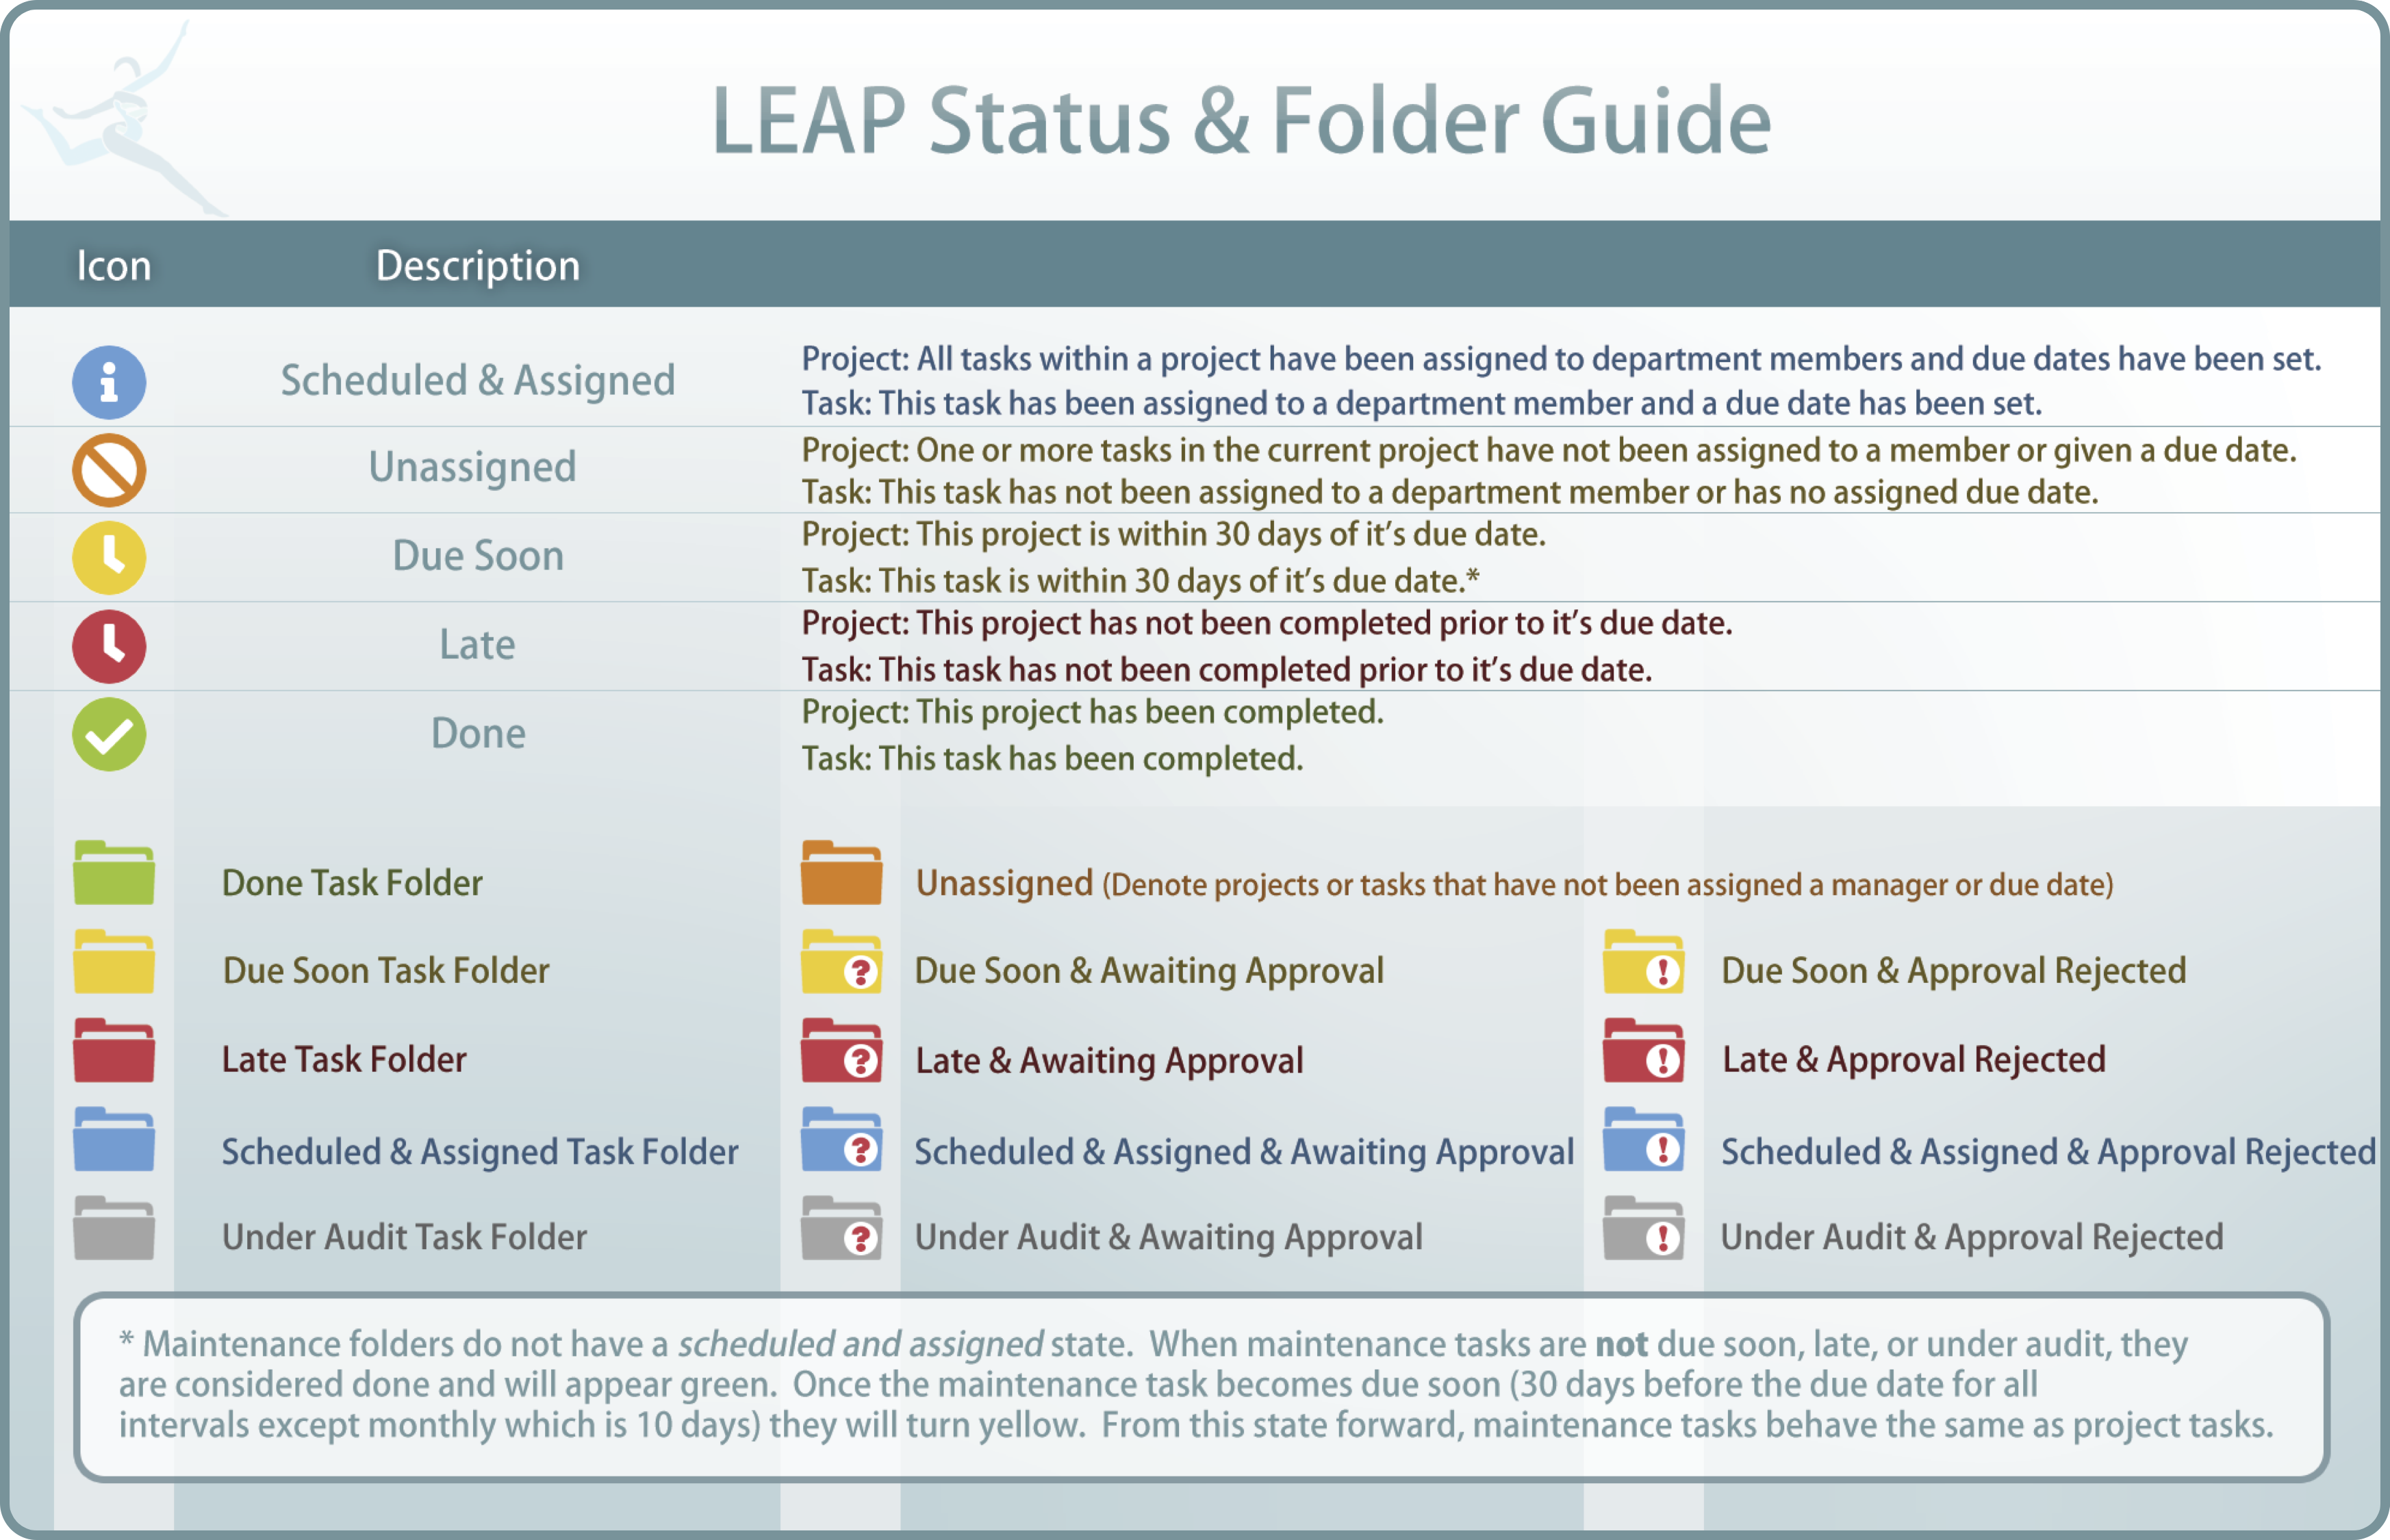
(See Status & Folder Guide for an in-depth look at all icons including folder colors and their meanings)
As QMS working groups go through the process of completing tasks associated to each FOS, a great many documents will be created. Many of these documents are vital to the process of creating compliance to a FOS but may not be necessary as evidence demonstrating compliance. The folders associated with the process of building compliance are called Working Evidence Folders (WEF).
Once all of the tasks associated to WEF are completed and approved in the process of building compliance to the standards, documents and comments that may be important to laboratory management and inspectors or assessors are selected for inclusion in the Master Evidence Folder (MEF).
Immediately after the completion of the MEF, the FOS is deemed in service and any maintenance tasks selected in the WEF associated with maintenance set-up (Task 4) are activated. Evidence of completion of QMS maintenance is placed in the Maintenance Folder (MF)
One of the key elements of LEAP is the system of checks and balances we call the approval system. It is the objective of this system to assure the quality and completeness of all aspects of your QMS by having everything checked by two discrete individuals. This system will be employed to confirm evidence in each WEF, MEF, and MF.
Note that, while LEAP Consultants have the ability to approve all evidence folders, CGI does not recommend this as Consultants are there to help you through your process, not do the job for you, and, technically, LEAP Consultants are not part of your organization.
Task 1 WEF and Task 5 MEF will need to be approved by a Department Manager or Organization Manager. Most accreditation bodies require initial approval of major documents like SOPs to be done by the Laboratory Director (OM in LEAP) prior to the document coming into effect.
Task 2, 3 and 4 WEFs can be approved by the Project Manager, Department Manager, or Organization Manager.
MFs can be approved by the Maintenance Task Manager, Department Manager, or Organization Manager.
This system has two functions. The first is to ensure the accuracy and quality of all information. The second, and arguably the more important function of the approval system, is to allow all stakeholders to learn from the QMS implementation and maintenance process.
NOTE: All approval requests can be canceled by the requester.
LEAP is based on a simple and effective methodology.
Step 1) Customization: You will receive a survey from your LEAP provider where you are required to give a list of user names and email addresses as well as information on your organization (i.e., what departments/assays you have). Based on this, a laboratory will be customized to meet your needs. Required departments will be activated, users will be assigned to their applicable departments, and permissions will be predetermined for each person (i.e., depending on whether the user is an OM, DM, or other user). A LEAP Consultant/Coach will be assigned to your laboratory and will be your main point of contact through your QMS journey.
Step 2) Gap Analysis: The Organization Manager or respective Department Managers will undertake a Gap Analysis to determine whether the laboratory is in compliance with each FOS or not. The result of this Gap Analysis will yield a project detailing what needs to be accomplished in order to satisfy your selected QMS compliance standards.
Step 3) Assign Tasks: Based on the result of the Gap Analysis, the Organization Manager or Department Managers will set up projects by assigning project managers and task managers and determining project schedules.
Step 4) Project Management: Each project will be tracked and recorded using LEAP to assure both completion and quality. All tasks will require a process of second-party approval as explained in the previous chapter, ensuring quality and aiding in the education and implementation process.
Step 5) Depositing Evidence: Evidence of compliance with each QMS component will be deposited and confirmed for completion and quality. This Evidence will typically consist of a policy and procedures, associated logs/worksheets, and other materials. Templates for all materials are available in the content library and within the Task 1 evidence folder for easy uploading and customization.
Step 6) Setting up QMS Maintenance: For each QMS component, you will need to assign managers and maintenance intervals in Task 4. You can also assign documents you created in Task 1~3 to certain maintenance tasks to allow quick access to documents required to complete maintenance.
Step 7) QMS Maintenance: Email reminders will be sent to your QMS Maintenance Managers prior to due dates. Maintenance tasks assigned to specific users will also be available on each LEAP user’s My Maintenance Tasks page. QMS maintenance will be tracked, and ongoing compliance will be transparent to your entire organization at both the department and individual level.
Step 8) New Standards: New QMS standards will be added on an ongoing basis. These standards can be considered for inclusion or not by performing a Gap Analysis and assigning projects or by doing a Self-Audit, as appropriate. Note that Self-Audits allow for a more transparent look into what standards have been added or modified.
Step 9) Automated Self-Audits: You can choose to audit your entire laboratory, a single department, or a single FOS with one click. This will require all QMS managers to review and, if necessary, update their QMS evidence.
Properly performing your Gap Analysis is one of the key components to managing your QMS journey using LEAP. Each FOS will have a list of standards. For ISO, this is a list of questions. For CAP, this will be actual standards from the CAP checklist. You can click on the “+” icon or go to the Overview to view the associated standards with a particular FOS.
If you are new to QMS, you will likely need to access the Content Library to educate yourself on what the requirements are and determine if your laboratory is in compliance with these requirements already or not. The Gap Analysis provides the Organization Manager/Department Manager to consider may be best qualified to accomplish tasks or would benefit the greatest from learning about the particular FOS, and give him/her the responsibility to review and approve documents and provide guidance to task managers by assigning these individuals the role of Project Manager.
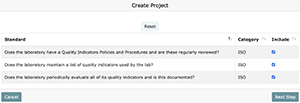
Once you are ready to create a project, click on the "Create Project" button, and you will be guided through the following steps.
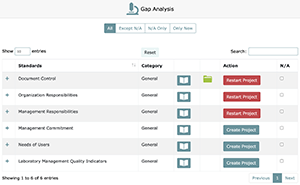
- Deselect any standards that do not apply to your laboratory and click "Next Step". (If unsure, leave all checked)
- Select a project manager and month you would like the system to base its calculation of maintenance due dates on.
- Once you have selected the project manager and maintenance date, you will need to assign tasks 1-4 to qualified department members and assign due dates. (Task 5 will be automatically assigned to the project manager.)
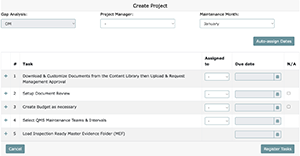
- Click "Register Tasks" and the project will be created.
Note: You can cancel the project creation sequence at any time by clicking "Cancel" in the bottom left corner.
To Review:
- N/A: This will omit the FOS or QMS components listed.
- Create Project: Click this button to begin the process of project creation.
- Restart Project: Click this button to begin the process of creating a project that will replace an existing project. (Completed or not)
When you determine you are not in compliance with any aspect or a certain aspect of an FOS, you should answer “No” to the Gap Analysis and assign an FOS Project Manager to help you become compliant. You or the assigned FOS Project Manager can then assign Task Managers to create and populate evidence for the initial 4 LEAP project management tasks, after which the Project Manager should be responsible for populating the final task. Details of each task are as follows:
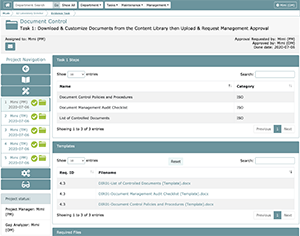
Task 1) Download & Customize Templates from the Content Library or Task 1 Evidence Folder then Upload & Request Management Approval:
Task 1 is where you first create, review, and approve documents you need in order to maintain compliance to the standards associated to the FOS. When you open the Task 1 window, you will first see a list of “Task 1 Steps”. This is basically a list of documents you need to create to fulfill all the requirements included in the FOS. Note that this does not necessarily mean you need to create all the files and will depend largely on how you decide to manage the FOS in relation with other FOSs.
If you scroll down, you will see a list of “Templates”. You may decide to use these templates accessible in Task 1 to begin the process of building compliance. If you are unsure about how to fill out a template, an associated sample can be found in the Content Library. In some cases, it may be appropriate to cut and paste applicable materials from the samples. The Project Manager or Task Manager given the responsibility to create these evidence files should take the time to read through the available content and consider services provided by the laboratory as well as practices already in place.
Each template is considered a “Required File” for the FOS and has a special upload field. Uploading either a modified template or your own document will associate the uploaded document with the listed requirement ID on the left. This ID can be used later on in the Document Management System to do a quick search during external audits. You may also decide to include documents not included as a template. These documents can be uploaded as a “Custom File”.
This task can only be approved by a Department Manager or higher because the resulting documents will make up the foundation of the entire FOS. If the Laboratory Director would like to designate this function to a Department Manager, this needs to be documented; otherwise, the Laboratory Director (Organization Manager) will be responsible for approving all documents in Task 1.
Note that CAP requires all new documents and heavily revised documents to be approved by the Laboratory Director, and this cannot be delegated to a designee.
Task 2) Setup Document Review for Task 1 Approved Materials:
Prior to implementing any policies and procedures as well as other materials for a particular FOS, it is important that all relevant laboratory staff members are educated on all documentation created within that project (i.e., specifically in Task 1). While you may decide to do this in a different manner (in which case you should N/A this task), LEAP has a Document Review feature that allows you to do this. Task 2 is where you setup this feature and will assign which members of your laboratory will need to review the documents approved in Task 1.
Once Document Review has been setup, each assigned user will receive an email notifying them that there are documents requiring their review. Each user can access these documents either by clicking on the link in their email or going to the My Document Reviews page. They should be required to finish Document Review prior to the due date for Task 5 (MEF).
Task 3) Create Budget, as necessary:
In some cases, you may be required to purchase materials or services which require going through a budgetary process. If there are no budget requirements, mark this Task as N/A. If you do require a budget, you can indicate this with a comment and/or place copies of requisition orders or other materials required by your management for budget approval. Remember, if materials are needed for the implementation of your policies and procedures and there is no budget (so no materials), you will not be in compliance.
Task 4) Select QMS Maintenance Team and Intervals:
In Task 4, the Task Manager is assigned as the default Maintenance Manager. The Task Manager can decide to change this, if necessary, for each maintenance task and can also add additional maintenance members, all of who will be responsible for completing the maintenance task at defined intervals once the project is completed. A list of documents created in Task 1 will also show up in the “Autoload Maintenance Documents” list. It is imperative that you select any associated documents to be included in the Maintenance Folder (MF) for reference by the Maintenance Manager and team members. All maintenance tasks have default interval settings, but they can be overridden here.
Note: Once Task 4 has been approved, the maintenance interval can no longer be adjusted unless a Gap Analysis or Self-Audit is performed. Never approve Task 4 without thinking carefully about who is going to be responsible for performing maintenance, what materials will need to be included in the MF to successfully complete these maintenance tasks, and the appropriate interval for the laboratory.
Task 5) Load Inspection Ready Master Evidence Folder (MEF):
One of biggest challenges in effectively implementing QMS is understanding how various documents and processes are related. This is why LEAP pulls together all associated documents in one place so these associations can be understood by the people who are responsible for implementation and maintenance of QMS. This will also help managers and inspectors’ oversight of vital QMS processes.
In Task 5, a list of all WEF contents including uploads and comments from previous tasks will be displayed. From this list, the Project Manager will select the materials that will be needed for compliance and then request review from the Department Manager. Note that only Project Managers can perform this Task, and only Department Managers or Organization Managers can approve it.
Once the project has been approved, the documentation within the MEF will be considered to come into effect and will be displayed as evidence in the Document Management System.
When you determine that you are in compliance with all standards related to a FOS, you can answer “Yes” to the Gap Analysis and a two-task project will be created. This project will only contain maintenance task setup and a MEF folder where existing evidence of compliance can be uploaded and then approved by a department manager.
Task 4) Select QMS Maintenance Team and Intervals:
When a two-task project is initiated, the only thing you can do in Task 4 is change the default Maintenance Manager, if necessary, add additional maintenance members, and change default intervals, if necessary. Unlike the five-task project, you cannot select documents to be placed in the Maintenance Folder (MF).
Task 5) Load Inspection Ready Master Evidence Folder (MEF):
In Task 5, you will need to upload all materials required to demonstrate compliance with the FOS. You will do this in the Evidence Files field found within the Task 5 MEF. Note that these files will be considered custom files and will not be associated with any requirement ID.
After population of the MEF is completed, review should be requested. Only Project Managers can perform this Task and only Department Managers or Organization Managers can approve it. Because no requirement ID is associated with custom files, you should consider incorporating the CAP/ISO standard ID in the name of the files so these will be searchable using the Document Management System.
Please remember that CGI recommends all laboratories using LEAP to initiate their FOS projects with a “No” compliance 5-Task project regardless of their status of compliance. This ensures that all required evidence for a particular FOS is being fulfilled, allows LEAP to properly associate uploaded files with requirement IDs, helps create evidence of education through the Task 2 document review stage, and allows you to associate relevant documents to maintenance tasks.
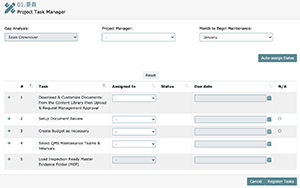
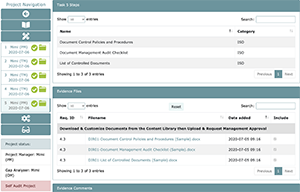
Below is an example of the project task manager screen which shows up when you complete a Gap Analysis and click on the Assign Tasks button. In this screen you can:
- Choose a project manager
- Choose month to begin maintenance (month from which quarterly, bi-annual, and annual maintenance due dates will be calculated)
- Choose task managers
- Assign task due dates
- Ask LEAP to auto-assign due dates
- N/A project tasks
- View associated steps (i.e., what documents you need to create or what actions you need to define and setup) by clicking the “+” icon
Task 1: Download & Customize Templates from the Content Library then Upload & Request Management Approval
The above is an example of the Task 1 WEF (Working Evidence Folder). Note: The Task 1 Task Manager will be responsible for organizing creation of the necessary documents and populating the task; the task itself must be approved by the Laboratory Director (Organization Manager) or a Department Manager, generally the manager that performed the gap analysis to create the project.
LEAP offers easy-to-use template files for quick access to the basic requirements for a particular project. With each template, there is a corresponding sample that can be found in the Content Library for the laboratory’s reference. Each of these templates has a corresponding upload slot. When evidence is loaded into these pre-defined slots, that evidence will be tied to a pre-determined requirement ID. All uploaded files are associated with the following properties:
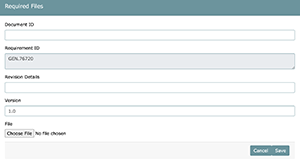
- Document ID (Custom value)
- Requirement ID/s (Determined by system when using required file area)
- Revision Details (Custom value)
- Version (Custom value)
Completing Task 1 correctly is a cornerstone of building effective and meaningful QMS processes and entails looking at the corresponding FOS overview, FOS education module, templates as well as corresponding samples, and any other materials found within the content library specific to the FOS. These materials can be used as the task manager sees fit, but everyone involved in creation of evidence of compliance also needs to think deeply about how the process will actually be implemented and maintained.
If you would like associate your own requirement ID’s, you can use the Custom Files area and input your own custom requirement ID.
Upon a file being uploaded into LEAP, those files need to be reviewed and approved. If upon approval a problem is found, revisions of that file can be made on the spot. The approver can simply fill out the "Request new revision" text area with the desired changes and that request will then be displayed under the "Details of revision request" prompt. This should act as a back and forth communication tool between the document creator and approver in quest for error free documentation. When task approvals are rejected, approvers can easily identify which document need to be adjusted as they will be highlighted in yellow as they are in a project self-audit.
Note: Further revisions made to a document require the document name and type be the same as the original file. Additionally, file version numbers will be incrementally increased as you upload newer versions. This can be overwritten by the uploader however.
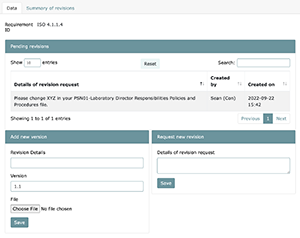
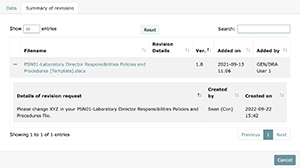
As new versions of files are uploaded, a historical view of that document will be visible under the "Summary of revisions" tab. Here you will be able to view the file creator, reasons for changes in the past, and the people and dates that made those requests.
If you decide to keep files in a different location besides LEAP, it is recommended to simply add a comment to the task using the comment box. You can add these comments as evidence when requesting approval. The comment box can also be used as a regular communication tool to communicate with your project members.
Note that all files you upload into the MEF will remain in the MEF until a Gap Analysis or Self-Audit is performed. You can access the MEF and the documents within through the Document Management System or by going to the All Task Manager page and using the filter “All MEF Tasks”.
Task 2: Setup Document Review for Task 1 Approved Materials
Task 2 will allow you to define which members of your organization need to review the documents created and approved in Task 1. This basically acts as a tool to educate relevant staff members on important policies and procedures as well as other documentation.
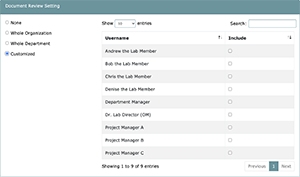
When setting up the Document Review, you have the option to Choose from the following:
- None: No members of your organization will be requested to review approved documents. This is similar to N/A’ing the task but allows you to make changes in the future.
- Whole Organization: All members of your organization will be requested to review approved documents.
- Whole Department: All members of this project’s department will be requested to review approved documents.
- Customized: All members selected by the Task 2 manager will be requested to review approved documents.
Once you have setup your document review in Task 2 and it has been approved, all members selected for review will be notified by email that they have reviews pending and the following button will show up in your Project Navigation.

Clicking on the document review button will take users to the document review screen which allows users to both educate themselves on Task 1 approved documents and confirm they have done so. Furthermore, this screen serves as a record of members that have completed/not completed review of all Task 1 evidence. If there are members that haven’t reviewed documents in an appropriate amount of time, Project Managers/Department Managers/Organization Manager can send reminder emails* through this screen by simply clicking on the Send button.
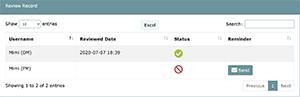
In order for LEAP to be flexible to changes in the laboratory’s organization, the system allows projects to be completed without all assigned members completing the document review process. In this case, LEAP provides a notification to the Project Manager prior to requesting final approval of the project (MEF). Note that any members who have not completed reviews will be visible on this screen which can be accessed by inspectors during external audits and may result in deficiencies.
Task 3: Create Budget as necessary

Some projects may require you to include a budget for required supplies. When this is the case, Task 3, like Task 1 and Task 2, will allow you to add both comments and custom uploads. If a budget is not necessary, you can either request approval with a comment noting that a budget is not necessary for this project or N/A’ing the task in the Project Task Manager screen upon setting up the project itself. Task 3 is an easily overlooked step, but an important part of building effective QMS. If required materials or services are not available due to lack of budget, this could result in lapses in QMS, loss of its attendant benefits, and present a risk to staff and patients.
Task 4: Select QMS Maintenance Team & Interval
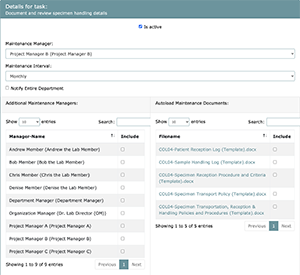
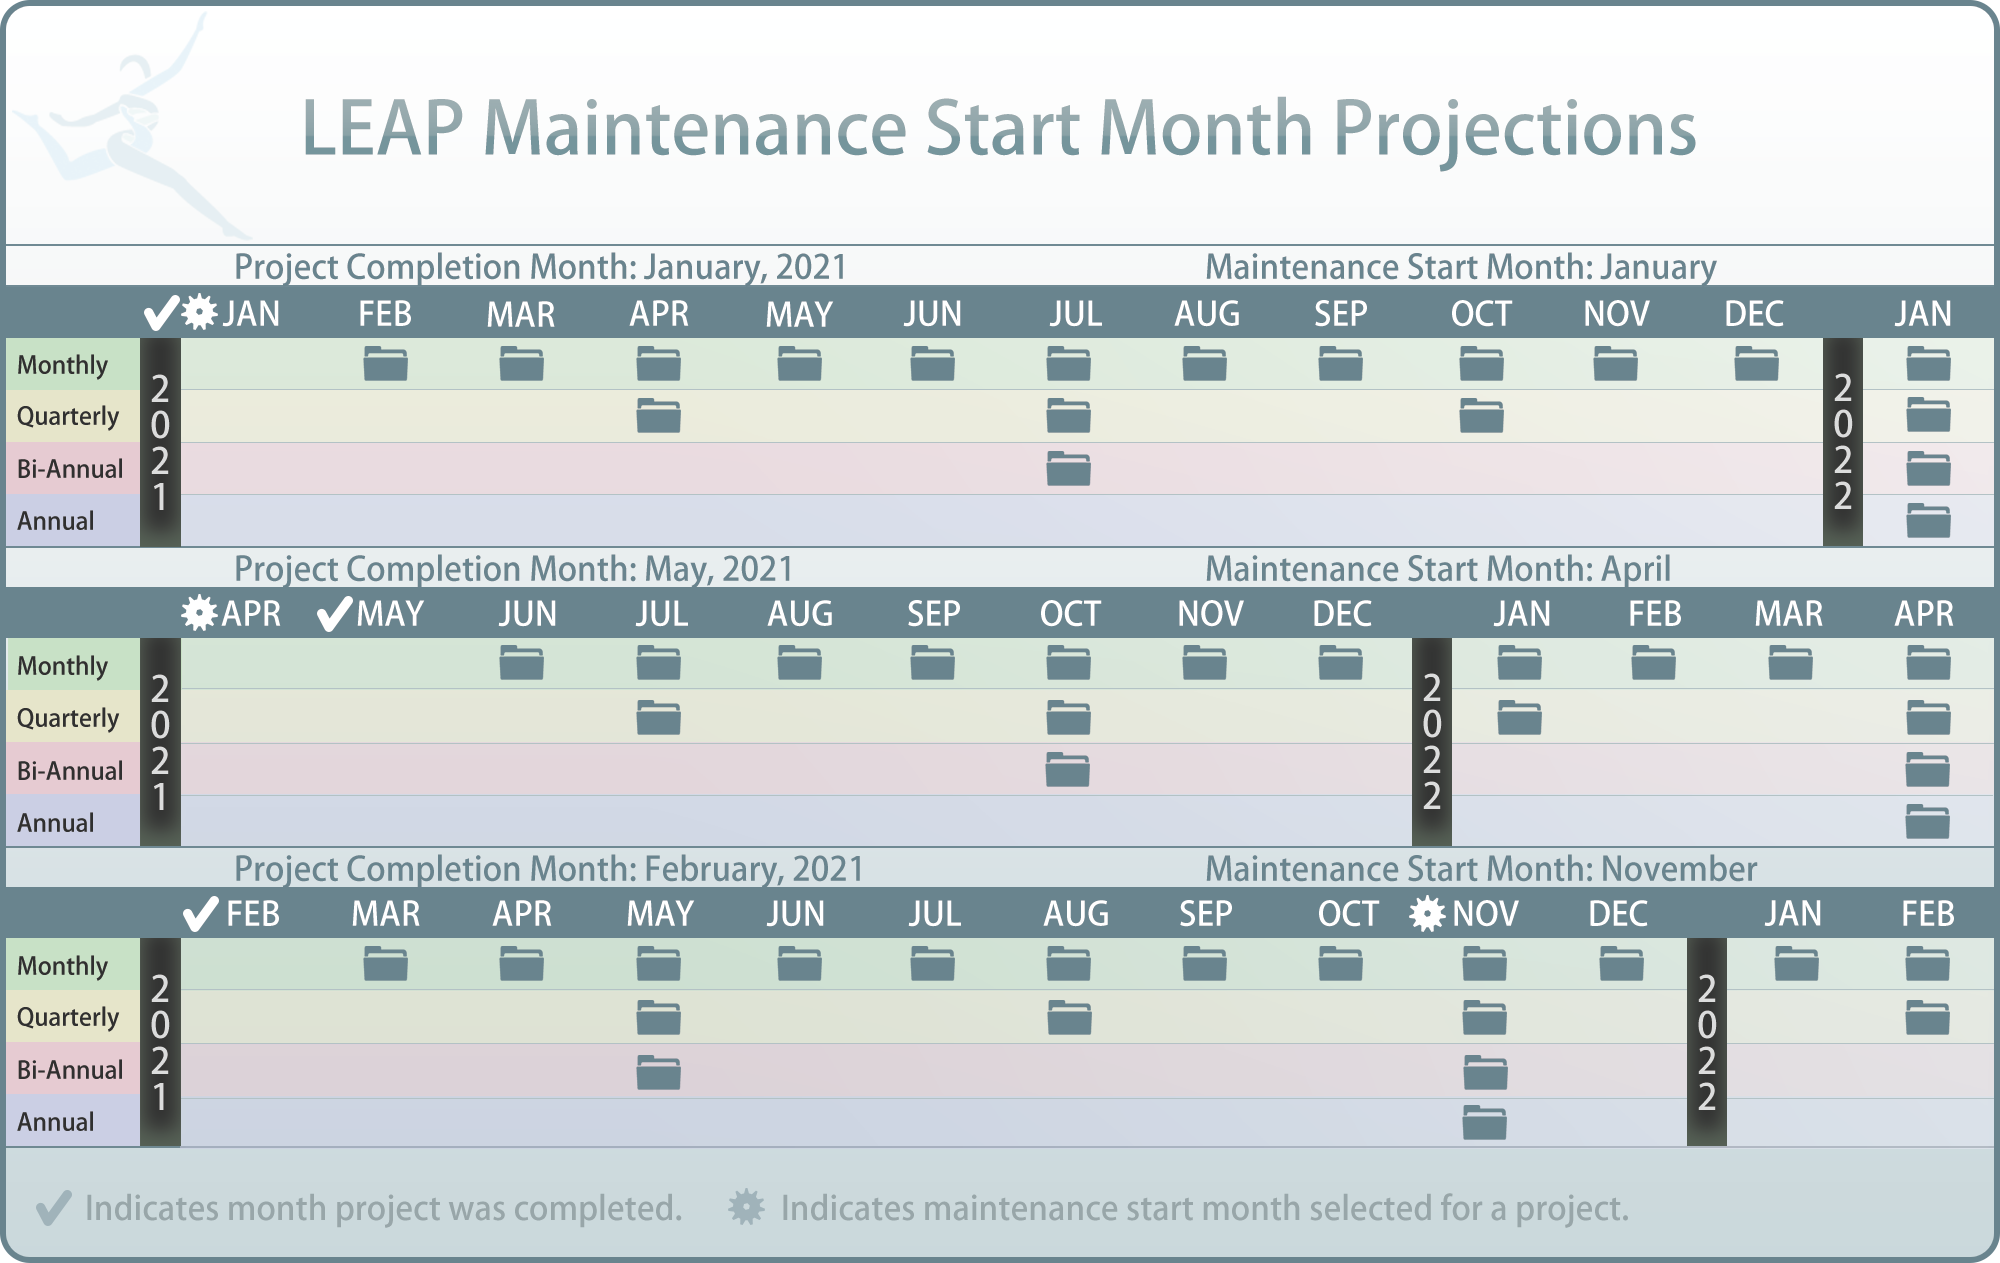
In order to maintain QMS and to ensure it is being implemented properly, projects in LEAP require maintenance tasks to be performed at different intervals. These intervals have a default setting but can be optionally overridden using Task 4. As well as interval settings, each project’s maintenance can be assigned a custom maintenance start month. This month will determine how the interval is laid out over the following year. (See maintenance start month chart for details)
Project level maintenance start months override department and laboratory default maintenance start month settings.
Note that the Task Manager assigned to Task 4 will become the default Maintenance Manager, who will be responsible for completing the maintenance task at defined intervals. The Task Manager, at this point, can assign a different Maintenance Manager, if needed, and add any additional members to manage and complete the maintenance task.
As all necessary documentation has been set up and approved at this point in the project workflow, any approved documents created may be attached to specific maintenance tasks for easy inclusion into the maintenance folders that will result from the creation of this project. To set up your maintenance tasks, you must click on one of the maintenance tasks from the list, which will lead to a menu will appearing on the bottom of the screen where you will be able to set up your maintenance team and intervals and select applicable documents by checking the boxes that correspond to your desired choices. All documents you select at this point will be included in the maintenance folder, so that, when the maintenance team needs to complete the maintenance task, they have easy access to relevant documents.
Task 5: Load Inspection Ready Master Evidence Folder (MEF)
Task 5 can only be performed by the Project Manager and approved by the Organization Manager or Department Managers who have been delegated this function by the Laboratory Director. It’s also important to remember that task 5 can only be worked on once tasks 1-4 are complete. This is because task 5 serves as the container for all evidence, including uploads and comments in other tasks. Project Managers will choose which comments and files should be included into the final master evidence folder (MEF). Once these comments and files have been chosen for inclusion into the MEF, the Project Manager should then request approval. In some cases, the Project Manager will have to include an additional custom file to fulfill the evidence of compliance. This usually is applicable if you have a log template that is used for maintenance, and you need to save the first iteration of the completed document in the MEF.
Once approved, Task 5 acts as the container for all active documents and allows you to perform a project level audit when you need to adjust documents that have already been approved. If you would like to learn more about project audit flow, see the Self Audits section of this manual.
Upon final approval of your project, LEAP will make project maintenance available via the project maintenance button located in the project navigation area.

The project maintenance screen will give you an overview of the selected project’s maintenance tasks, their assigned intervals, to whom each task is assigned to, and the due date for each tasks’ next interval.
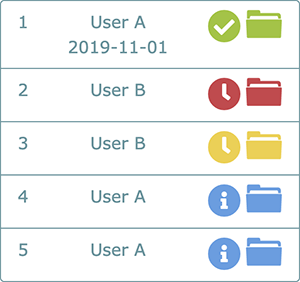
By simply clicking on the maintenance tasks button, LEAP will allow you to instantly view the content of the currently due task folder. To view previous intervals of that maintenance task (when applicable), simply click on the back arrow (shown below in blue) and chose an interval to view.

In this example, the carousel selector shows a monthly maintenance task which has 3 previous iterations and 1 current iteration. The first two, Jan & Feb are denoted in green. This color mirrors the behavior of LEAP’s project folders which means these tasks were completed and approved. March however shown in red is late and needs to be addressed immediately. The current iteration, shown in yellow, is due soon. To address the late task pictured above the user would simply click on that iteration, check evidence and/or upload evidence, and request approval. Once that maintenance iteration has been approved, it will turn green.
As with regular project tasks, until a task is considered due soon, it will be shown in blue.
With the completion of each FOS Task 4, you are required to assign managers to maintain the projects standards and their associated maintenance. A quick look at your laboratory’s overall maintenance status is shown on the QMS Dashboard which also displays a list of projects that contain late maintenance tasks. Department Dashboards also show a department-level, overall status pie chart and a list of projects that contain late maintenance tasks within the given department.
For a more detailed view on a specific department’s maintenance, navigate to the department maintenance dashboard accessible from the department menu.
On this dashboard you will be able to see:
- The entire organization’s maintenance status
- The current department’s maintenance status
- A historical view of your department’s and your organization’s maintenance status: History View
To check maintenance tasks only assigned to yourself and quickly identify what needs to be done to remain in compliance, click on the “Maintenance” menu and then click on “My Maintenance Tasks”.
Things to include in Maintenance Folders
Maintenance folders (MF) can include a variety of materials to document evidence of QMS compliance. This can include things like instrument maintenance logs, environmental control logs, quality meeting minutes, non- conformity reporting logs, etc. These documents should have been created in Task 1 of the relevant FOS and included in the maintenance folder through Task 4. LEAP’s minimum maintenance cycle is 30 days. In the case that you perform, for example daily maintenance, this should be recorded outside of LEAP and uploaded into the MF once a month for supervisor review.
It is possible to perform annual document reviews for documents such as Assay SOPs or Policies and Procedures in each FOS by using the Maintenance system. The self-audit process, however, may be a more effective way of using LEAP for annual reviews. You will need to make this determination when you set up your Task 4 maintenance for each FOS project. If you decide that annual reviews are to be handled through a Self- Audit, you should be N/A’ing any maintenance task that require an annual review of documentation.
From the maintenance menu, it is possible to view maintenance tasks across the entire laboratory by clicking on Universal Maintenance Calendar. Here you can see all maintenance tasks for all departments. While this view is also possible by clicking on All Maintenance Tasks (if you do not select a department), the Universal Maintenance Calendar has additional features built in.
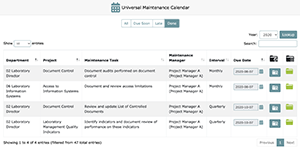
You can edit due dates for maintenance that is in window and not late by using the calendar function, edit maintenance managers and team members from the Maintenance Protocol Setup screen (i.e., Task 4 screen with your customizations saved), and see all uploaded maintenance via the Maintenance Folder. You can also use this Maintenance Folder to upload and request approval for materials. Remember, you cannot edit due dates once the maintenance task is late; even if you complete a late maintenance project, LEAP will keep a record that this maintenance task was late (displayed on the History View). Therefore, you have to keep vigilant about these due dates or your inspector can cite you for delayed maintenance.
Within LEAP, you can trigger a self-audit at any time. The reasons for a self-audit can be to: a) Prepare for an external audit, b) Perform and document an internal audit, c) Training and familiarize new department managers on QMS processes, d) Perform corrective actions or make changes in any materials, or e) Perform an annual review of relevant documents (in place of performing an annual maintenance).
A self-audit can be triggered only by the Organization Manager for the entire laboratory or by an Organization Manager or Department Manager for any single department or for any single project. When a organization- level or department-level self-audit is triggered, the following occurs:
- All applicable Department Managers and Project Managers are sent an e-mail notification that the audit has been triggered and MEFs are deposited in each Project Managers My Task screen (use the “All” filter).
- All completed (Green) FOS project folders turn grey
- All Task 1-4 project folders are un-editable
- All Task 5 folders become a compliance review screen where all standards and project evidence is displayed and will be reviewed by a Department Manager or Project Manager
- The current and active version of the project will be accessible from the Document Management screen and other locations.
In the grey Task 5 folder, the Department Manager or Project Manager must determine if the project is in compliance with relevant standards. In order to do so, the following must be executed:
- Review all documents within each assigned MEF.
- Review all maintenance tasks and their associated evidence to assure ongoing compliance with the listed standards is being maintained.
Once all reviews have been executed and deficiencies identified, to answer either “Yes” (All contained evidence in the project is in compliance) or “No” (there are deficiencies that need attention to and/or editing).
In the case where “Yes” is selected, the project will be ready for review by a Department Manager who will be sent an e-mail notification that the MEF is waiting for approval in their My Task screen. The gray MEF will be overlaid with a question mark to identify that the folder is waiting for approval.
From this point, the project will behave the same as a normal 2-task project waiting for a Task 4 and MEF (Task 5) approval. Once the MEF has been approved, the project and all of its associated folders (i.e., Task 4 and Task 5) will return to their “done” green state. Please be aware that selecting “Yes” to the Self-Audit and going through the 2-task project setup will result in losing associated Document Review abilities and maintenance task document association abilities as these tasks are dependent on approved Task 1.
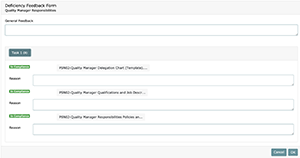
In the case where project evidence in the MEF and/or MF is determined to not be in compliance or you would like to re-educate staff, “No” should be selected. You will then be guided to the Deficiency Feedback Form, where the Project Manager or Department Manager should provide an explanation about what needs to be done to bring the project back into compliance. This feedback can be general to the project and/or specific to each document created in the project tasks. You must always fill out, at least, the general feedback when stating “No” to a Self-Audit.
In order to write specific comments about deficiencies noted in each document, simply click on the task button that contains the relevant documentation. Note that on the Deficiency Report Form, each task contains the number of documents associated with that task in brackets. All tasks and their corresponding uploads will be available for review and commenting. If the document is in compliance, the text field that appears under the file name should be left empty. When text is entered into the field associated with that document, it will be considered not in compliance and turn red. (See the following screenshot)
Once you submit the deficiency feedback form (by clicking OK), you will be taken to the Project Task Manager screen, but the following will also occur:
- All tasks in the project will become editable.
- The project will be due in 30 days.
- All project members will be copied from the original project and a grey folder for the task they are assigned to will appear in their My Tasks page.
- All folders will remain grey until the project has been completed.
Note that you can change the team members assigned to each task and the Self-Audit due date using the Project Task Manager screen.
Comments noted on the deficiency feedback form will be show up at the bottom of the task screen in the Comments section. If no other comment besides the general comment was made to documents, an automatic comment by the user who carried out the Self-Audit stating “Although no evidence was marked out of compliance, please check it again” will be included in the Comments section. (See the following screenshot)
Once all tasks of the audited project have been completed and approved, all of that project’s folders will return to green and all task statuses will read as “done”.
It is important that all 5 steps be completed when correcting deficiencies. Failure to do so may result in: a) Incorrect documents being maintained; b) People being unaware of changes made to corrected documents, c) Budget unavailabile to properly implement the changes/corrections, d) Incorrect maintenance protocols and associations being used, and, most importantly, e) Deficiencies’ to be cited during external audits.
Project-level Self-Audits are slightly different in that the process already assumes there is a problem with the project, and therefore, you are automatically considered “out of compliance” (i.e., answer “No” to the Self- Audit). You will immediately be taken to the deficiency feedback form and should go through the same process as the “No” process described above. Instead of Department Managers and Project Managers receiving emails, this Self-Audit trigger will send emails to the Project Manager and Task Managers.
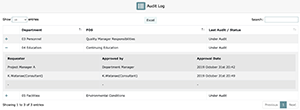
LEAP not only allows you to audit your laboratory and its departments but also keeps a log of each FOS that has been audited. Upon first load of the “Audit Log”, you’ll see each FOS listed next to its relative department along with its most recent audit date. If the FOS in question is currently under audit, that will be denoted in the “Last Audit / Status” column as shown below.
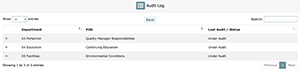
In the event you would like to see previous audits of a particular FOS, simply click on the “+” mark and a dropdown menu will appear showing you the audit dates, the user that requested approval of the audited MEF (usually the Project Manager), and the user that approved it (either the Department Manager or Organization Manager).
Depending on which set of standards your lab is using (i.e., ISO, CAP, or Basic QMS), the standards associated are likely to be updated by the accreditation body at a determined interval. When those updates are made, LEAP will help you integrate them into your laboratory by identifying which projects may be affected and listing those projects on the QMS dashboard of your organization under New/Revised FOS.
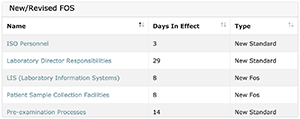
This list will consist of all FOSs that have either been newly created or have been revised in terms of inclusion of new and/or revised standards. When you have already completed a project that is in this list, the FOS listed will link to your project’s audit selection screen such that you can decide the best path forward. If you have not begun or completed a project, clicking on the FOS will take you to the Gap Analysis screen.
If you have already completed the project, depending on the depth of change made to the standards, you may need to perform a Gap Analysis again. With smaller changes, you may only need to perform a project-level Self-Audit as you will likely want to re-use the bulk of your current documentation. LEAP makes this determination easy by color coding standards according to their degree of change.
Standards marked as:
- Yellow are new standards and would require a gap analysis be performed for inclusion into your project.
- N/A’ed Standards were excluded from your project when you first performed the gap analysis. In the event these standards now apply to your laboratory due to a change in wording or content, a gap analysis will need to be performed to include them. If they still do not apply to your laboratory, they can be ignored and you do not need to perform a gap analysis or self-audit.
- Orange denoted standards are standards that have been modified. If there are only orange marked standards that apply to your project you may choose the project self-audit in order to make any modifications necessary to bring this project into compliance.
Once you have completed either a new gap analysis or self-audit on your project, the project will no longer appear in the aforementioned New/Revised FOS list on your QMS Dashboard, and your laboratory will be in full compliance with the latest standards associated to the chosen accrediting body. Note that, unless otherwise notified by the respective accrediting body, your laboratory has a full year to implement changes in accordance with these new/revised standards.
LEAP’s document management system is both ISO and CAP compliant, it allows you to quickly locate any active documents contained within an approved Master Evidence Folder (completed projects), Maintenance Task, or Working Files (files contained in project not yet complete).
During the 5-Task process, uploads are linked to their respective requirement IDs unless they are custom files. This allows a streamlined search of files by standard ID number, which speeds up the inspection process. Inspectors don’t need to know what you named a file, and you don’t need to remember a long ID number to find it.
You can customize the document management system display to simplify the columns shown on the screen. The only default setting you cannot change is to display the file name. You can also use the search function to search by:
- Department
- FOS Name
- Requirement ID
- File name
- Creator Name (i.e., Name of the user who uploaded the document in the task)
- Creation Date (i.e., Date when the document was uploaded into the task)
- Approved By Name (i.e., Name of the user who approved the task in which the document was uploaded)
- Approved Date (i.e., Date when the task, in which the document was uploaded, was approved)
- Project Approved Date (i.e., Date when the MEF of the project was approved)
You can also select one or more files in the document management screen by clicking on the check box on the left column to either download the documents themselves in bulk or download a list of these documents with the above information (basically creating a list of controlled documents). To download individual files, simply click on the file name of the desired file.
LEAP can also display files based on their relation to a project. To display all custom upload files related to a search result for required documents based on their shared project, check the box next to “Include related documents”. You can also access any task folder and the documents within by clicking on the folder icon on the document management screen.
LEAP’s document management system is designed to allow users to understand the interlinkages among documents. When searching and retrieving a document you can view it in context with the other associated documents in the same folder.
LEAP’s document management system is designed to allow users to understand the interlinkages among documents. When searching and retrieving a document you can view it in context with the other associated documents in the Master Evidence Folder (MEF) and have access to the associated Maintenance Folder (MF) and the most recently retired documents.
LEAP’s document management system is unique and surpasses all document management requirements. You may, however, need to explain to external inspectors how it works and its attendant advantages.
Below is a screenshot of the document management screen in action:
LEAP throws NOTHING away. All materials are automatically retired once you redo a Gap Analysis or complete a Self-Audit.
Materials that are retired include:
- All files and communications loaded into WEFs and MEFs
- Identities and time stamps associated with all files and comments
- All evidence of maintenance task completion
- All identities and time stamps associated with maintenance tasks
- All Department Manager, Project Manager and Task Manager Assignments
- All identities and time stamps associated with assignments
- Date the project was retired
Retired documents are available to all organization members.
In theory, LEAP will archive all your QMS evidence for at least 7 years. Note that LEAP data is backed up every 24 hours, so theoretically the chance of loss of your data is low. Regardless, it is not possible for LEAP to guarantee the viability of your data 100%. Therefore, it is recommended that you keep local back up files for all QMS data.
E-mails will automatically be sent to relevant LEAP users in the following cases:
- When a LEAP user account has been created, deactivated, moved
- When user passwords have been successfully changed
- Assignment of a Task, Maintenance Task
- Assignment of Document Reviews
- Any project or maintenance Task becoming due within 30 days (Turning Yellow)
- Any project or maintenance Task turning Late (Red)
- When a self-audit is triggered
- When document reviews are requested
- When approval of a project task is requested
Users can easily navigate to tasks or documents to be reviewed by clicking on the link within the email. In your user settings page, users can also turn on/off email notifications for project related email and maintenance related email.
Note: When an organization turns email notifications off for the organization, individual users will lose the ability to control their own email settings. If an organization manager turns the organization email settings off, then on again, individual users will regain their ability to control their own email settings.
LEAP is a cloud-based system and has implemented industry standard security protocols. Each user gets an individual account which can only be accessed with their email and password.
LEAP is also backed up to a server every 24 hours, so, theoretically, there is very little chance of you losing the data saved in LEAP.
We recommend, however, that you take the following actions to assure the security of your data:
- Backup all files on a local data storage (e.g. secured laboratory computer)
- In the case of sensitive data, such as employee or patient data, always password-protect files. [This can be accomplished using any Microsoft Office application]
Users will have the ability to click on the link and go directly to LEAP and to the appropriate screen view, which is typically the My Task view or My Maintenance Task view.
Dear Organization Manager,
Your role in your laboratory’s QMS journey using LEAP is a vital one. To be most effective, you will need to attend the LEAP QMS Academy. You will also need to build a strong relationship with your LEAP coach. Before attending the Academy, you will need to submit the following information to your LEAP coach so that a customized LEAP organization can be set up:
- Define which laboratory sections available in LEAP you want to include
- Names and e-mail address for each of your laboratory staff members
- Determine who will be the department manager(s), including the primary department manager
- Determine who will be the department members (Potential Task Managers)
You may appoint one or more managers in each department. Note that these appointments will be official and you will be delegating the authority and responsibility associated to being a department manager including approval of evidence files; in order to maintain compliance with QMS standards (both ISO and CAP), you need to clearly define these functions to each person using the job description and delegation charts that will be available in LEAP and created as part of your QMS processes.
Only a single person can be the primary department manager, but you may assign multiple other department managers. When creating job descriptions and delegation charts, you should consider if you need to define the difference functions each department manager will take on or if they will be delegated the same functions.
All LEAP users will have vast resources at their disposal. Within LEAP, they will be armed with detailed common-sense overviews, education materials, document templates and corresponding samples for each FOS. They will also have the support of your LEAP coach who will support you and all your lab members that are part of LEAP with all things LEAP and with how to access vital information within the online support and FAQ system.
The key elements you need to look for when appointing a department manager(s) are primarily three things:
- Willingness to participate
- Knowledge about the department and staff
- Willingness to learn about QMS and how to use LEAP (Note that none of the LEAP users including department managers are expected to be fully knowledgeable about QMS)
Once you provide your LEAP coach with the above information, CGI will use it to customize LEAP for your lab and register your department managers and members as LEAP users; your job as organization manager is primarily one of oversight. In this role, you will need to be prepared to:
- Approve major documents that will define your QMS and your laboratory’s services
- Monitor LEAP QMS dashboards regularly to identify problems,
- Reassign department managers who are failing, if necessary, or consider educating them properly on aspects they are having trouble with,
- Reassign department members, if necessary, or consider educating them properly on aspects they are having trouble with,
- Assign temporary inspector status to CAP or ISO inspectors so that they have access to documentation prior to and during inspections, hopefully leading to a faster, more effective inspection overall,
- Assign new staff members with appropriate LEAP user permissions,
- Confirm all completed MEFs prior to triggering self-audits or performing new gap analysis, and
- Approve the changing of project schedule delays after they become late
- Take ultimate responsibility for the implementation and maintenance of QMS
Best of luck with your important and challenging position as LEAP QMS Organization manager. Your LEAP coach is here to support you in any way they can.
- LEAP System Administration
Dear Department Managers,
Congratulations on your appointment as a QMS manager of your department. In this capacity, the Laboratory Director or designee is officially assigning you the following authority and responsibility: You are going to be taking the primary responsibility for implementing and maintaining QMS in your department(s). While your role may differ depending on whether you are the primary department manager or not, the Laboratory Director (Organization Manager) or designee should help define your exact functions. In either case, your role in your department’s QMS journey may include the following:
- Review the content library and learn about each FOS
- Evaluate each FOS for compliance in the Gap Analysis
- Assign project managers for each FOS
- Ensure that department members in your laboratory learn about LEAP and QMS as well as gain an understanding of materials created during your QMS process
- Approve or reject (with guidance to task managers) all Task 1 materials
- Approve or reject (with guidance to task managers) all Task 5 (MEF) materials
The most important role you will be playing is to act as an educator and a supervisor for your department members. You will be responsible for approving Task 1) and Task 5) folders, unless otherwise specified by the Laboratory Director or designee. Note that, in some cases, accreditation bodies will not accept your approval to be sufficient, and the Laboratory Director (OM) will have to take on this role, particularly for newly created documents. If you are delegated this task and decide to reject materials, make sure to leave detailed instructions as to what is required to gain approval. Know that it is not uncommon to have folders rejected multiple times. This is simply a part of the mentoring process aimed at achieving the best results and does not imply incompetence.
There are two things you need to remember to be a successful department manager. First, you need to understand the materials found in the content library yourself in order to guide your department members and reasonably approve projects. You will also need to carefully choose each FOS project manager. The ideal candidate will need to be motivated and enthusiastic about understanding and completing the assignment. Remember, all of the information and support materials required for them to successfully complete their projects are found within LEAP. Also, they will have the ability to call upon your LEAP coach for support.
Neither you nor your selected project/task managers need to be knowledgeable about QMS. You will, however, need to be ready to dig into available resources, communicate, collaborate, and learn from each other, from LEAP coach, and from third parties. This process is designed to be rigorous so that QMS can be deeply engrained into your laboratory and all the benefits for your lab, doctors, and patients can be realized.
Best of luck with your important and challenging position as LEAP QMS Department Manager. Your LEAP Coach and Consultants are here to support you in any way we can.
- LEAP System Administration
Dear Project Managers,
Congratulations on being assigned as a project manager by your organization manager or department manager. As the project manager, you will be on the frontline of building and maintaining your laboratory’s QMS.
If your delegated project has been determined to be in-compliance, your job will be as follows:
- Learn about LEAP and QMS
- Change maintenance manager, if necessary, and add other maintenance task members and assign maintenance intervals
- Locate and deposit all evidence of compliance in the MEF
- Request approval for each task from your department manager or organization manager
If your delegated project has been determined not to be in compliance, your job will be as follows:
- Learn about LEAP and QMS
- Determine if any of the project steps are N/A
- Assign yourself or a Task manager for each task
- Approve all WEF when requested by your Task Managers
- If you assign yourself to Task 4, change maintenance manager, if necessary, and add other maintenance task members and assign maintenance intervals
- Populate the MEF with files and comments found in the approved WEFs
- Ensure that document review of all Task 1 approved materials is complete before requesting MEF approval
- Request a MEF approval from your department manager or organization manager
There are two things you need to remember to be a successful project manager. First, you need to understand the materials found in the content library yourself in order to guide your task managers and reasonably approve completed tasks and populate the MEF. You will also need to carefully choose each task manager. The ideal candidate will need to be motivated and enthusiastic about understanding and completing the assignment. Remember, all of the information and support materials required for you and your task managers to successfully complete the projects are found within LEAP. Also, you will have the ability to call upon your LEAP coach for support.
Neither you nor your selected task managers need to be knowledgeable about QMS. You will, however, need to be ready to dig into available resources, communicate, collaborate, and learn from each other, from the LEAP coach, and from third parties. This process is designed to be rigorous so that QMS can be deeply engrained into your laboratory and all the benefits for your lab, doctors, and patients can be realized.
Best of luck with your important and challenging position as LEAP QMS project manager. Your LEAP coach is here to support you in any way they can.
- LEAP System Administration
Dear Task Managers,
Congratulations on being assigned as a task manager. As the task manager, you will be taking primary responsibility for the successful building, integration and maintenance of your QMS. This is a huge responsibility, but a manageable one. Remember, each FOS has been divided into manageable pieces. Also, all of the information you will need to fully understand what each FOS means and how to implement it will be found with in LEAP. Lastly, know that you are not alone. Your working group including other task managers and your project manager as well as your department manager and your LEAP coach will be there to support you.
As a Task manager, you will be assigned to understand and complete one or more of the following tasks:
- Customize the LEAP templates (or create your own) to create the initial evidence of compliance to standards and gain approval from a department manager or organization manager (Task 1)
- Ensure that the appropriate stakeholders are educated about approved documents in Task 1 (Task 2)
- Assure the budgets are prepared, as appropriate (Task 3)
- Make sure the right people are assigned as the maintenance manager and team members for each maintenance task and set the maintenance interval. And, most importantly, make sure appropriate and relevant materials have been selected for placement into the maintenance folder (MF) so that the maintenance team can complete their tasks in a timely manner (Task 4; Note that if your department manager or organization manager has selected “Yes” to the Gap Analysis, you will not be able to do this important function of associating relevant materials for maintenance task. Make sure the gap analyzer is aware of this and make sure that no association of documents are necessary before proceeding with request for approval)
As you complete your tasks, you will be required to place evidence of compliance of your tasks into your Working Evidence Folders (WEF). When you are satisfied these are complete and of the highest quality, you will need to request approval from your project manager or superior. Do not be discouraged if your evidence is initially rejected. This is a part of the learning and implementation process and only means your manager is being attentive and doing their job.
This process is designed to be rigorous so that QMS can be deeply engrained into your laboratory and all the benefits for your lab, doctors and patients can be realized.
Best of luck with your important and challenging position as LEAP QMS task manager. Your LEAP coach and Consultants are here to support you in any way we can.
- LEAP System Administration
Dear Maintenance Managers,
Congratulations on being assigned as a maintenance manager. Remember, the value we are seeking by undertaking QMS is:
- Economic Efficiencies
- Productivity
- Patient and Employee Safety, and most importantly;
- Quality Patient Outcomes
Your laboratory has gone through the rigorous task of complying with the FOS and built evidence of compliance for QMS standards; you have been assigned to take on the role of the maintenance manager. In a very real sense, you are the guardian, and it is your responsibility to ensure that your QMS is going to yield the value from the massive investment of time and money. If you fail to perform your task on time or if you do it poorly, all of the time and effort spent on building QMS can become a waste.
You are going to be sent an email once your maintenance task becomes in window and close to the due date. You can also track all your maintenance tasks on your personal My Maintenance Tasks screen found within LEAP. You can view everyone’s maintenance tasks in the All Maintenance Tasks, and if you want to see the complete maintenance schedule this can be viewed in the Universal Maintenance Calendar.
There are different ways of completing QMS maintenance. The best way is to place files in your maintenance folder (MF) clearly showing maintenance has been completed. This can be in the form of a marked-up document, maintenance log or even pictures or videos. The other method is to note completion of maintenance in the comment section of the MF. If you do this make sure and clearly identify where the actual maintenance evidence can be found.
Note: If you are participating in a virtual inspection or audit program, uploading the actual maintenance evidence into the MF may be mandatory.
With time, you will see that QMS maintenance is a meshing of gears, and the value comes from all gears turning smoothly. A single gear can stop or slow the machine. You are the bedrock of your QMS system.
Make us proud, and please, feel free to ask for help when you need it!
- LEAP System Administration
We recognize the great efforts required for your laboratory to build and maintain your QMS. We also know that it may not be possible for you to go through the official process of being regularly inspected and certified by an authorized body. It is for this reason that CGI provides optional QMS certificates of achievement for clients using LEAP. In order to gain a certificate of achievement, you will need to inform your LEAP provider that you would like to participate. They will then schedule a virtual online audit. This audit will include a perusal of all your dashboards to make sure all gap analysis has been completed on relevant FOSs and standards, projects are set up and are being completed on schedule and in compliance with the related standards, and all maintenance is being performed in accordance with your Task 4 settings. We will also spot check your content to ensure the quality of your materials meet minimum standards.
In the case the virtual audit demonstrates you are in compliance to basic QMS processes, a certificate of achievement will be issued. If you are found not to be in compliance, a report listing the deficiencies you will need to remedy will be provided. You should adopt necessary corrective action and document these before rescheduling another audit.
LEAP certificates are good for one year. Additional fees may apply.
The CAP and ISO standards are organized quite differently, but there are many commonalities. In some cases, laboratories choose to comply with both CAP and ISO standards. In order to facilitate audits and inspections, these dual compliance labs may choose to build and implement two separate systems. We believe that building and maintaining two separate systems can be overly resource intensive and lead to inefficiencies. Rather, it is better to have a single system that complies to both standards. It is for this reason, CGI is developing a CAP / ISO crosswalk. This is how it works:
- 1) CGI will open all applicable ISO departments and all applicable CAP departments. So, you will have, for example, (CAP) Clinical Chemistry and ISO Clinical Chemistry departments.
- 2) Your laboratory will need to choose which standard will be your primary standard. NOTE: In most cases, it is preferable to choose CAP as your primary standard because it is more detailed in nature.
- 3) You will perform your gap analysis, set up projects and complete projects in your primary standard departments.
- 4) After your primary standard departments are complete, you will then perform a gap analysis on your secondary departments. CGI can provide you with a list of documents that are overlapping in both CAP and ISO and which FOS/department the documents can be found in. If you are in compliance, place a comment noting where evidence of compliance can be located and N/A all related maintenance tasks. If you are not in compliance, complete the project as usual. In the case you are in partial compliance, complete only areas that are not in compliance and place a comment noting where other evidence of compliance can be located.
This may be a bit confusing at first, but once you do a couple FOSs it will become easier. Keep in mind that this is much preferable to maintaining two separate QMS systems.
LEAP has been painstakingly designed to be suitable for all kinds of laboratories, both large and small. Of course, large labs have large numbers of people and smaller labs have fewer people. The size of the laboratory and your organization will impact how you organize and operate LEAP.
For example, in large labs, you may assign a different department manager for each department (or working group). You may even consider assigning multiple department managers in a single department so that you can take on different roles. At the other end of the spectrum, in a very small lab, a single person may be required to take the role of department manager for a number (or even all) departments. This same logic goes for project managers, task managers, and maintenance managers.
Regardless of your laboratory’s size we encourage you to involve as many people as possible in building and maintaining your QMS. The more people you have involved, the more value you will receive. At the very least, even if you do not assign them to be a manager of a project or task, you should consider adding all members of your laboratory for educational purposes (i.e., by utilizing the content library and the document review feature).
Work with your LEAP coach to determine the best way to set up and organize your LEAP QMS systems.